> ## Documentation Index
> Fetch the complete documentation index at: https://www.1password.dev/llms.txt
> Use this file to discover all available pages before exploring further.
# Use 1Password to securely provide credentials to AI agents
export const StatusBadge = ({children}) => {children};
export const InlineImage = ({src, alt = "", height = "1.6em"}) => {
return  ;
};
export const Image = ({src, darkSrc, alt, width, border, height, round}) => {
const classNames = ["mint-mx-4"];
if (border) {
classNames.push("mint-rounded-sm");
}
if (round) {
classNames.push("mint-rounded-lg");
}
const style = {};
if (width) style.width = typeof width === "number" ? `${width}px` : width;
if (height) style.height = typeof height === "number" ? `${height}px` : height;
return darkSrc ? <>
0 ? style : undefined} />
;
};
export const Image = ({src, darkSrc, alt, width, border, height, round}) => {
const classNames = ["mint-mx-4"];
if (border) {
classNames.push("mint-rounded-sm");
}
if (round) {
classNames.push("mint-rounded-lg");
}
const style = {};
if (width) style.width = typeof width === "number" ? `${width}px` : width;
if (height) style.height = typeof height === "number" ? `${height}px` : height;
return darkSrc ? <>
0 ? style : undefined} />
 0 ? style : undefined} onError={e => {
e.target.src = src;
}} />
: 0 ? style : undefined} />;
};
export const Small = ({children}) => {
return {children};
};
Early Access
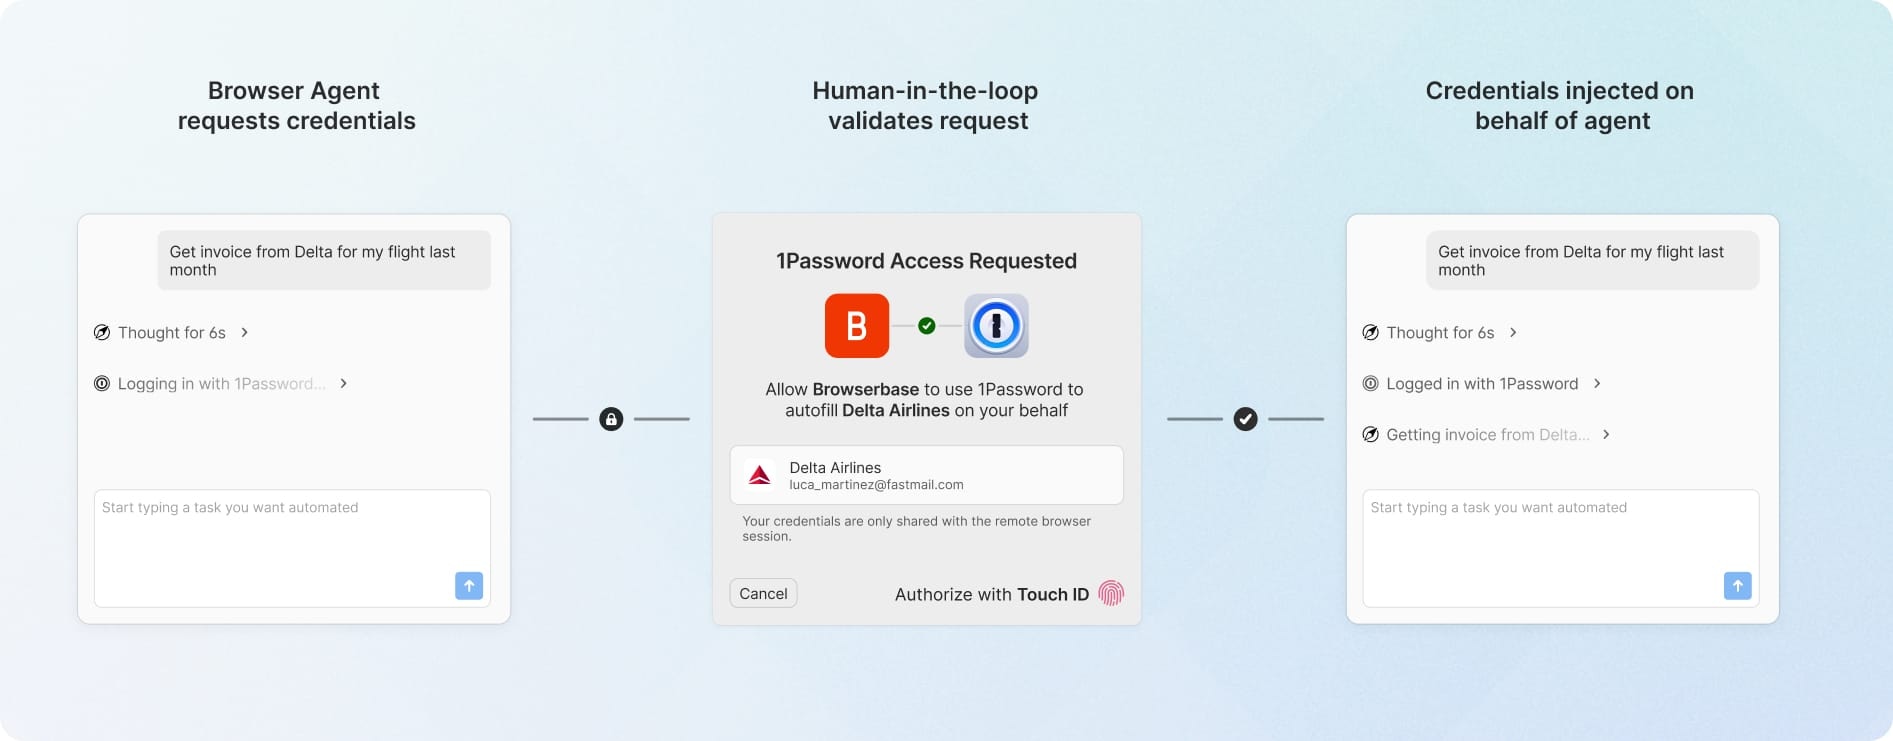
1Password Agentic Autofill gives you a secure way to provide credentials to AI agents, so they can sign in on your behalf without directly handling your secrets.
Instead of providing credentials to an AI agent using unencrypted methods like plaintext secrets or environment variables, you can tell an agent to sign in to a website using 1Password. When the agent needs to sign in, you'll be prompted to approve or deny the request.
After you approve, the 1Password browser extension in the agent's headless browser autofills your login details over an end-to-end encrypted channel and signs in to the website. In the future, you'll be able to see detailed audit logs that show when, where, and why the agent accessed the item.
During the Early Access, you can use Agentic Autofill with [Browserbase Director ](https://www.director.ai/), Browserbase's no-code AI agent that automates web-based tasks using natural language prompts.
## How the Browserbase integration works
When you set up the Browserbase integration, 1Password validates its pairing partner is director.ai and rejects any untrusted party, then establishes an end-to-end encrypted channel between your 1Password desktop app and Browserbase.
When the agent needs to sign in, it sends a request over the encrypted channel to autofill items that match the login website you specified, triggering an approval prompt from your 1Password desktop app for each autofill request. If you approve the request, the item is sent encrypted to the headless 1Password browser extension, which injects only the minimum required credential data from the approved item into the login form.
0 ? style : undefined} onError={e => {
e.target.src = src;
}} />
: 0 ? style : undefined} />;
};
export const Small = ({children}) => {
return {children};
};
Early Access
1Password Agentic Autofill gives you a secure way to provide credentials to AI agents, so they can sign in on your behalf without directly handling your secrets.
Instead of providing credentials to an AI agent using unencrypted methods like plaintext secrets or environment variables, you can tell an agent to sign in to a website using 1Password. When the agent needs to sign in, you'll be prompted to approve or deny the request.
After you approve, the 1Password browser extension in the agent's headless browser autofills your login details over an end-to-end encrypted channel and signs in to the website. In the future, you'll be able to see detailed audit logs that show when, where, and why the agent accessed the item.
During the Early Access, you can use Agentic Autofill with [Browserbase Director ](https://www.director.ai/), Browserbase's no-code AI agent that automates web-based tasks using natural language prompts.
## How the Browserbase integration works
When you set up the Browserbase integration, 1Password validates its pairing partner is director.ai and rejects any untrusted party, then establishes an end-to-end encrypted channel between your 1Password desktop app and Browserbase.
When the agent needs to sign in, it sends a request over the encrypted channel to autofill items that match the login website you specified, triggering an approval prompt from your 1Password desktop app for each autofill request. If you approve the request, the item is sent encrypted to the headless 1Password browser extension, which injects only the minimum required credential data from the approved item into the login form.
 1Password protects communication using forward-rotating key material and the Noise framework that protects your data all the way from your approving 1Password device to the remote browser's webpage, ensuring your data cannot be leaked accidentally. 1Password and Browserbase exchange new key material after every autofill to provide post-compromise security for all autofills performed prior.
When Browserbase and 1Password are paired, Browserbase may be able to tell when an item matching an autofill request exists, even if the request is denied.
### What Browserbase can do
When you turn on the integration, Browserbase can:
* Request to autofill items on your behalf
### What Browserbase can't do
Browserbase cannot:
* Access items without your approval
* See a list of your items
* Modify your items
## Before you get started
Before you get started with the integration, you'll need to:
1. Sign up for [Browserbase Director ](https://www.director.ai/) and [1Password](https://1password.com/pricing/password-manager).
2. Install the [1Password desktop app](https://1password.com/downloads).
3. Install the [1Password browser extension](https://1password.com/downloads/browser-extension).
Make sure to turn on [Touch ID](https://support.1password.com/touch-id-mac/), [Windows Hello](https://support.1password.com/windows-hello/), or a Linux [system authentication option](https://support.1password.com/system-authentication-linux/) in the 1Password app for the best authentication experience.
### Administrators: Turn on the agentic autofill policy
If you're using a 1Password Business account, your administrator must turn on the agentic autofill policy for your team before you can use it. To do this, they'll need to:
1. Sign in to their account on 1Password.com.
2. Select **Policies**, then select **Manage** under "Sharing and permissions".
3. Turn on the policy "Allow AI Agents to autofill for users".
## Step 1: Connect 1Password and Browserbase
To set up the integration with Browserbase:
1. Sign in to [Browserbase Director ](https://www.director.ai/).
2. Select ** Connect 1Password** beneath the input field. You'll be redirected to 1Password.com.
3. Sign in to the 1Password account you want to use with Browserbase Director, then select **Continue**. If your 1Password desktop app is locked, you'll be prompted to unlock it.
4. Select **Next** to return to Browserbase Director and complete the pairing flow.
After pairing, you should see a check next to the 1Password icon beneath the input field.
To turn off the integration, select the 1Password icon beneath the input field, then toggle off **1Password Autofill**. You can also select **Disconnect** to unpair 1Password and Browserbase.
You can currently pair Browserbase with 1Password on one device. If you set up the integration on a second device, 1Password de-authorizes the integration on the original device.
## Step 2: Create an item
You can create an item with sample data for a website like [autofill.me ](https://autofill.me/) to test the integration.
1Password protects communication using forward-rotating key material and the Noise framework that protects your data all the way from your approving 1Password device to the remote browser's webpage, ensuring your data cannot be leaked accidentally. 1Password and Browserbase exchange new key material after every autofill to provide post-compromise security for all autofills performed prior.
When Browserbase and 1Password are paired, Browserbase may be able to tell when an item matching an autofill request exists, even if the request is denied.
### What Browserbase can do
When you turn on the integration, Browserbase can:
* Request to autofill items on your behalf
### What Browserbase can't do
Browserbase cannot:
* Access items without your approval
* See a list of your items
* Modify your items
## Before you get started
Before you get started with the integration, you'll need to:
1. Sign up for [Browserbase Director ](https://www.director.ai/) and [1Password](https://1password.com/pricing/password-manager).
2. Install the [1Password desktop app](https://1password.com/downloads).
3. Install the [1Password browser extension](https://1password.com/downloads/browser-extension).
Make sure to turn on [Touch ID](https://support.1password.com/touch-id-mac/), [Windows Hello](https://support.1password.com/windows-hello/), or a Linux [system authentication option](https://support.1password.com/system-authentication-linux/) in the 1Password app for the best authentication experience.
### Administrators: Turn on the agentic autofill policy
If you're using a 1Password Business account, your administrator must turn on the agentic autofill policy for your team before you can use it. To do this, they'll need to:
1. Sign in to their account on 1Password.com.
2. Select **Policies**, then select **Manage** under "Sharing and permissions".
3. Turn on the policy "Allow AI Agents to autofill for users".
## Step 1: Connect 1Password and Browserbase
To set up the integration with Browserbase:
1. Sign in to [Browserbase Director ](https://www.director.ai/).
2. Select ** Connect 1Password** beneath the input field. You'll be redirected to 1Password.com.
3. Sign in to the 1Password account you want to use with Browserbase Director, then select **Continue**. If your 1Password desktop app is locked, you'll be prompted to unlock it.
4. Select **Next** to return to Browserbase Director and complete the pairing flow.
After pairing, you should see a check next to the 1Password icon beneath the input field.
To turn off the integration, select the 1Password icon beneath the input field, then toggle off **1Password Autofill**. You can also select **Disconnect** to unpair 1Password and Browserbase.
You can currently pair Browserbase with 1Password on one device. If you set up the integration on a second device, 1Password de-authorizes the integration on the original device.
## Step 2: Create an item
You can create an item with sample data for a website like [autofill.me ](https://autofill.me/) to test the integration.
1. Open and unlock the [1Password desktop app](https://1password.com/downloads/).
2. Select **+ New Item** to create a new item.
3. Select **Login** for the item category.
4. Select the username field and enter an example username like `hello`.
5. Select the password field, then select **Create a new password** to generate a random password.
6. Select the website field and enter `https://autofill.me`. If you want to test a different Login item, make sure the website is set to the URL where you sign in to the account.
7. Select **Save** to create the item.
## Step 3: Prompt the agent to sign in to a website using 1Password
In the [Browserbase Director ](https://www.director.ai/) input field, instruct the agent to sign in to a website using 1Password and hit enter.
For example, to have the agent sign in to `autofill.me` with the test Login item you created in the previous step, enter the prompt:
```
sign in to https://autofill.me/form/login-simple using 1Password
```
You'll get a prompt from 1Password asking you to authorize or cancel the request from Browserbase. If you have multiple items for the same website, you can select the down arrow next to the suggested login to choose a different item.
Authorize the prompt in the same way you unlock your 1Password account, like with Touch ID, and 1Password will fill your login in the remote browser session.
If you make a second request to sign in using 1Password in the same workflow, you may need to select the **Log in with 1Password** button in Browserbase Director.
## Troubleshooting
### If Browserbase and 1Password don't pair successfully
If you have trouble pairing 1Password and Browserbase, try the following steps:
#### Make sure the 1Password browser extension and your 1Password desktop app are connected
For the pairing process to work successfully, your 1Password browser extension and desktop app must be connected. To check if they're connected:
1. Select in your browser's toolbar, then select your account or collection in the top left > **Settings**.
2. Select **General** and make sure the "Integrate this extension with the 1Password desktop app" setting is toggled on and the integration status is connected.
If your 1Password browser extension and app aren't connected, [turn on the appropriate settings](https://support.1password.com/connect-1password-browser-app/#check-your-settings).
#### Make sure your app is open and unlocked
Before beginning the pairing process, open the 1Password desktop app and unlock it. Then, follow the steps to [connect 1Password and Browserbase](#step-1-connect-1password-and-browserbase).
### If you see a warning that the request is taking longer than expected
If you see a warning from Browserbase that the request is taking longer than expected, your 1Password app may be locked. Open the 1Password desktop app and unlock it, then try the request again.
If you're still having trouble or want to share feedback, [contact 1Password support](mailto:support@1password.com).
## Learn more
* [Closing the credential risk gap for AI agents using a browser](https://blog.1password.com/closing-the-credential-risk-gap-for-browser-use-ai-agents/)
* [The security principles guiding 1Password’s approach to AI](https://blog.1password.com/security-principles-guiding-1passwords-approach-to-ai/)
* [Workflow: Secure AI access](/get-started/secure-ai-access)