> ## Documentation Index
> Fetch the complete documentation index at: https://www.1password.dev/llms.txt
> Use this file to discover all available pages before exploring further.
# Use the 1Password desktop app to sign in to 1Password CLI
export const BetaBadge = ({content}) => {
if (content) {
return Beta;
}
return <>
Beta
;
};
export const CodeResult = ({children, resultLang, wrap, expandable}) => {
const parseChildren = () => {
let language = "text";
let codeContent = "";
const extractText = node => {
if (typeof node === "string") {
return node;
}
if (Array.isArray(node)) {
return node.map(extractText).join("");
}
if (node?.props?.children) {
return extractText(node.props.children);
}
return "";
};
const extractLanguage = node => {
if (!node) return null;
if (node.props?.className) {
const className = node.props.className;
const langMatch = className.match(/language-(\w+)/);
if (langMatch) {
return langMatch[1];
}
}
if (node.props?.["data-language"]) {
return node.props["data-language"];
}
if (node.props?.language) {
return node.props.language;
}
return null;
};
if (typeof children === "string") {
codeContent = children;
} else if (Array.isArray(children)) {
codeContent = extractText(children);
for (const child of children) {
const detectedLang = extractLanguage(child);
if (detectedLang) {
language = detectedLang;
break;
}
}
} else if (children?.props) {
const detectedLang = extractLanguage(children);
if (detectedLang) {
language = detectedLang;
}
codeContent = extractText(children);
}
const parts = codeContent.split("#code-result");
if (parts.length < 2) {
return {
command: codeContent.trim(),
result: null,
language,
defaultOpen: false
};
}
const resultText = parts[1].trim();
const defaultOpen = resultText.startsWith("open");
const cleanResult = defaultOpen ? resultText.slice(4).trim() : resultText;
return {
command: parts[0].trim(),
result: cleanResult,
language,
defaultOpen
};
};
const {command, result, language, defaultOpen} = parseChildren();
const [isOpen, setIsOpen] = useState(defaultOpen);
if (!result) {
return children;
}
return
{}
{}
{isOpen &&
}
;
};
export const Image = ({src, darkSrc, alt, width, border, height, round}) => {
const classNames = ["mint-mx-4"];
if (border) {
classNames.push("mint-rounded-sm");
}
if (round) {
classNames.push("mint-rounded-lg");
}
const style = {};
if (width) style.width = typeof width === "number" ? `${width}px` : width;
if (height) style.height = typeof height === "number" ? `${height}px` : height;
return darkSrc ? <>
0 ? style : undefined} />
0 ? style : undefined} onError={e => {
e.target.src = src;
}} />
: 0 ? style : undefined} />;
};
export const BetaWrap = ({children}) => {
return <>;
};
You can use the [1Password desktop app](https://1password.com/downloads) integration to quickly and securely sign in to [1Password CLI](/cli/get-started/). The app integration allows you to:
* Seamlessly sign to the 1Password accounts you've added to the app in your terminal.
* Authenticate 1Password CLI the same way you unlock your device, like with your fingerprint, face, Apple Watch, Windows Hello PIN, or device user password.
* Track recent 1Password CLI activity from your 1Password app.
## Requirements
* [1Password subscription](https://1password.com/pricing/password-manager)
* [1Password for Mac](https://1password.com/downloads/mac)
* [1Password subscription](https://1password.com/pricing/password-manager)
* [1Password for Windows](https://1password.com/downloads/windows)
* [1Password subscription](https://1password.com/pricing/password-manager)
* [1Password for Linux](https://1password.com/downloads/linux)
* [PolKit](https://gitlab.freedesktop.org/polkit/polkit) (included in many popular distributions)
* A PolKit authentication agent running
## Set up the app integration
### Step 1: Turn on the app integration
1. Open and unlock the [1Password app](https://1password.com/downloads/).
2. Select your account or collection at the top of the sidebar.
3. Navigate to **Settings** > **[Developer](onepassword://settings/developers)**.
4. Select **Integrate with 1Password CLI**.
5. If you want to authenticate 1Password CLI with your fingerprint, turn on **[Touch ID](https://support.1password.com/touch-id-mac/)** in the app.
1. Open and unlock the [1Password app](https://1password.com/downloads/).
2. Select your account or collection at the top of the sidebar.
3. Turn on **[Windows Hello](https://support.1password.com/windows-hello/)** in the app.
4. Navigate to **Settings** > **[Developer](onepassword://settings/developers)**.
5. Select **Integrate with 1Password CLI**.
1. Open and unlock the [1Password app](https://1password.com/downloads/).
2. Select your account or collection at the top of the sidebar.
3. Navigate to **Settings** > **[Security](onepassword://settings/security)**.
4. Turn on **[Unlock using system authentication](https://support.1password.com/system-authentication-linux/)**.
5. Navigate to **Settings** > **[Developer](onepassword://settings/developers)**.
6. Select **Integrate with 1Password CLI**.
### Step 2: Enter any command to sign in
After you've turned on the app integration, enter any command and you'll be prompted to authenticate. For example, run this command to see all the vaults in your account:
```shell theme={null}
op vault list
```
#### If you have multiple accounts
If you've added multiple 1Password accounts to your desktop app, you can use [`op signin`](/cli/reference/commands/signin/) to select an account to sign in to with 1Password CLI. Use the arrow keys to choose from the list of all accounts added to your 1Password app.
```shell highlight={2} theme={null}
op signin
#code-result
Select account [Use arrows to move, type to filter]
> ACME Corp (acme.1password.com)
AgileBits (agilebits.1password.com)
Add another account
```
You can also [select an account on a per-command basis using the `--account` flag](/cli/use-multiple-accounts/#specify-an-account-per-command-with-the-account-flag) with your account's sign-in address or ID.
```shell theme={null}
op vault ls --account my.1password.com
```
If you're signed in to multiple accounts in the app but only want to use a specific account with 1Password CLI, you can [set the `OP_ACCOUNT` environment variable](/cli/use-multiple-accounts/#set-an-account-with-the-op_account-environment-variable) to your account's sign-in address or ID.
### Optional: Remove previously added account details
Make sure you have access to your Secret Key and account password before removing account details from your configuration file.
If you previously [added an account to 1Password CLI manually](/cli/sign-in-manually/) and now want to exclusively use the 1Password app to sign in, you can remove your account details from your configuration file.
Your configuration file is in one of the following locations:
* `~/.op/config`
* `~/.config/op/config`
* `~/.config/.op/config`
Use the [account forget](/cli/reference/management-commands/account/#account-forget) command to remove all existing account information from your configuration file. This won't impact the accounts added to your 1Password app.
```shell theme={null}
op account forget --all
```
### Optional: Set the biometric unlock environment variable
You can use the `OP_BIOMETRIC_UNLOCK_ENABLED` environment variable to temporarily toggle the app integration on or off.
To turn on the integration:
To turn off the integration:
**Set a default account to use with the 1Password app integration**
Run `op account use` to set a default 1Password account to use with the 1Password app integration in your current terminal session. 1Password CLI will prompt you to select an account.
```shell theme={null}
op account use --account my.1password.com
```
## Track 1Password CLI activity
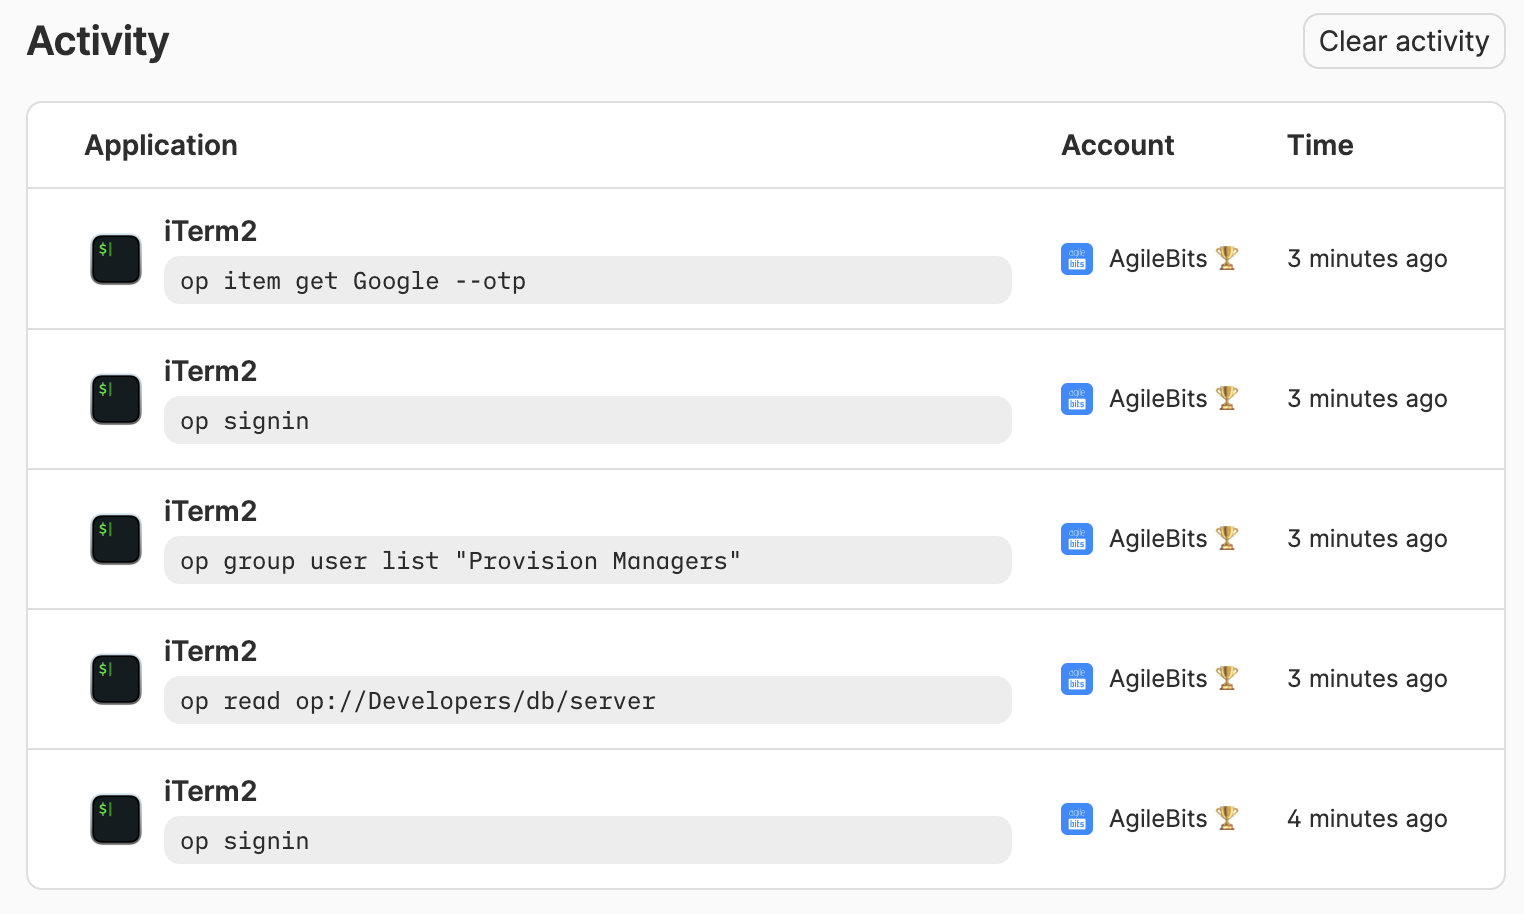
You can track 1Password CLI activity authenticated with the 1Password app, including the command, when it was run, the application where it was run, and the name of the account accessed.
To see your 1Password CLI activity log:
1. Open and unlock the 1Password desktop app.
2. Select **Developer** in the sidebar.
3. Select **View CLI**.
You'll see a table with your recent 1Password CLI activity.
Your activity log data is encrypted on your device. Older entries get purged regularly, and you can manually clear your activity log data at any time. If you don’t want to use activity logging, turn off **Record and display activity** in the [1Password Developer settings](onepassword://settings/developers).
## Troubleshooting
### If `op signin` doesn't list your account
`op signin` returns a list of all accounts you've added to the 1Password desktop app. To sign in to 1Password CLI with a new 1Password account, you'll need to [add the account to the app](https://support.1password.com/add-account/).
### If you see a connection error
If you see a `connectionreset` error, or an error that 1Password CLI couldn't connect to the 1Password desktop app, try the following:
Open **System Settings** > **General** > **Login Items** and make sure **Allow in background** is turned on for 1Password.
If you still see an error, try the following:
1. Make sure you're using the latest version of the 1Password desktop app.
2. Restart the app.
If you're using 1Password for Mac version 8.10.12 or earlier, the 1Password CLI binary must be located in the `/usr/local/bin/` directory.
1. Make sure you're using the latest version of the 1Password desktop app.
2. Restart the app.
1. Make sure you're using the latest version of the 1Password desktop app.
2. Restart the app.
If you see a `LostConnectionToApp` error when you try to authenticate:
Make sure the option to keep 1Password in the menu bar is turned on:
1. Open and unlock the 1Password desktop app.
2. Select your account or collection at the top of the sidebar.
3. Select **Settings** > **General**.
4. Make sure "Keep 1Password in the menu bar" is selected.
Make sure the option to keep 1Password in the notification area is turned on:
1. Open and unlock the 1Password desktop app.
2. Select your account or collection at the top of the sidebar.
3. Select **Settings** > **General**.
4. Make sure "Keep 1Password in the notification area" is selected.
Make sure the option to keep 1Password in the system tray is turned on:
1. Open and unlock the 1Password desktop app.
2. Select your account or collection at the top of the sidebar.
3. Select **Settings** > **General**.
4. Make sure "Keep 1Password in the system tray" is selected.
### If you aren't prompted to authenticate with your preferred method
If you've turned on the app integration, but aren't prompted to sign in to 1Password CLI with your expected authentication method:
Make sure you've set up [Touch ID](https://support.1password.com/touch-id-mac/) or an [Apple Watch](https://support.1password.com/apple-watch-mac/) to unlock 1Password on your Mac.
Make sure you've set up [Windows Hello](https://support.1password.com/windows-hello/) to unlock 1Password on your Windows PC.
1. Make sure you've set up [system authentication](https://support.1password.com/system-authentication-linux/) to unlock 1Password on your Linux computer.
2. Update the authentication method in your Linux settings to use a [fingerprint](https://help.ubuntu.com/stable/ubuntu-help/session-fingerprint.html.en) or other biometrics instead of your Linux user password.
## Learn more
* [Use multiple 1Password accounts with 1Password CLI](/cli/use-multiple-accounts/)
* [Add accounts to the 1Password app](https://support.1password.com/add-account/)
* [1Password app integration security](/cli/app-integration-security/)
* [Developer quickstart](/get-started/developer-quickstart)