> ## Documentation Index
> Fetch the complete documentation index at: https://www.1password.dev/llms.txt
> Use this file to discover all available pages before exploring further.

# 1Password Connect

export const Link = ({to, className = "", children}) => {
  const baseStyles = "inline-block px-6 py-3 text-center font-medium text-white no-underline transition-all duration-200";
  const buttonStyles = {
    "button--primary": "mint-bg-[#0969DA] hover:mint-bg-[#0860CA] mint-rounded-lg mint-border-b-0",
    "button--secondary": "mint-bg-gray-600 hover:mint-bg-gray-700 mint-rounded-lg mint-border-b-0"
  };
  const classes = className.split(" ");
  const buttonClass = classes.find(c => c.startsWith("button--"));
  const otherClasses = classes.filter(c => !c.startsWith("button"));
  const appliedStyles = buttonClass ? `${baseStyles} ${buttonStyles[buttonClass] || ""} ${otherClasses.join(" ")}` : `${baseStyles} ${className}`;
  return <a href={to} className={appliedStyles}>
      {children}
    </a>;
};

export const HighlightCard = ({title, preheader, link, src, darkSrc, children, useButton = true}) => {
  return <div className="bg-white dark:bg-zinc-900 border border-gray-200 dark:border-zinc-800 rounded-xl shadow-sm flex flex-col h-full not-prose overflow-hidden mb-4">
      {preheader && <div className="bg-gray-50 dark:bg-white/5 border-b border-gray-200 dark:border-white/10 px-6 py-3">
          <span className="text-sm font-medium text-gray-600 dark:text-gray-400 block">{preheader}</span>
        </div>}
      <div className="p-6 flex flex-col flex-grow">
        <h3 className="text-lg font-bold text-gray-900 dark:text-white mb-2 mt-0 flex items-center gap-2">
          {src && <>
              {darkSrc ? <>
                  <span className="dark:hidden">
                    <Icon icon={src} size={32} />
                  </span>
                  <span className="hidden dark:inline">
                    <Icon icon={darkSrc} size={32} />
                  </span>
                </> : <Icon icon={src} size={32} />}
            </>}
          {title}
        </h3>
        <div className="text-gray-600 dark:text-gray-300 mb-6 flex-grow leading-relaxed">{children}</div>
        {link && <div className="mt-auto">
            {useButton ? <a href={link.to} className="inline-flex items-center justify-center bg-[#0094FC] hover:bg-[#007acc] text-white font-medium py-2 px-4 rounded-lg transition-colors no-underline text-sm">
                {link.text || "Learn more"}
              </a> : <a href={link.to} className="highlight-card-link hover:opacity-80 font-medium hover:underline inline-flex items-center gap-1 group text-sm">
                {link.text || "Learn more"}
                <Icon icon="arrow-right" className="text-inherit" />
              </a>}
          </div>}
      </div>
    </div>;
};

<CardGroup cols={2}>
  <div>
    <p>
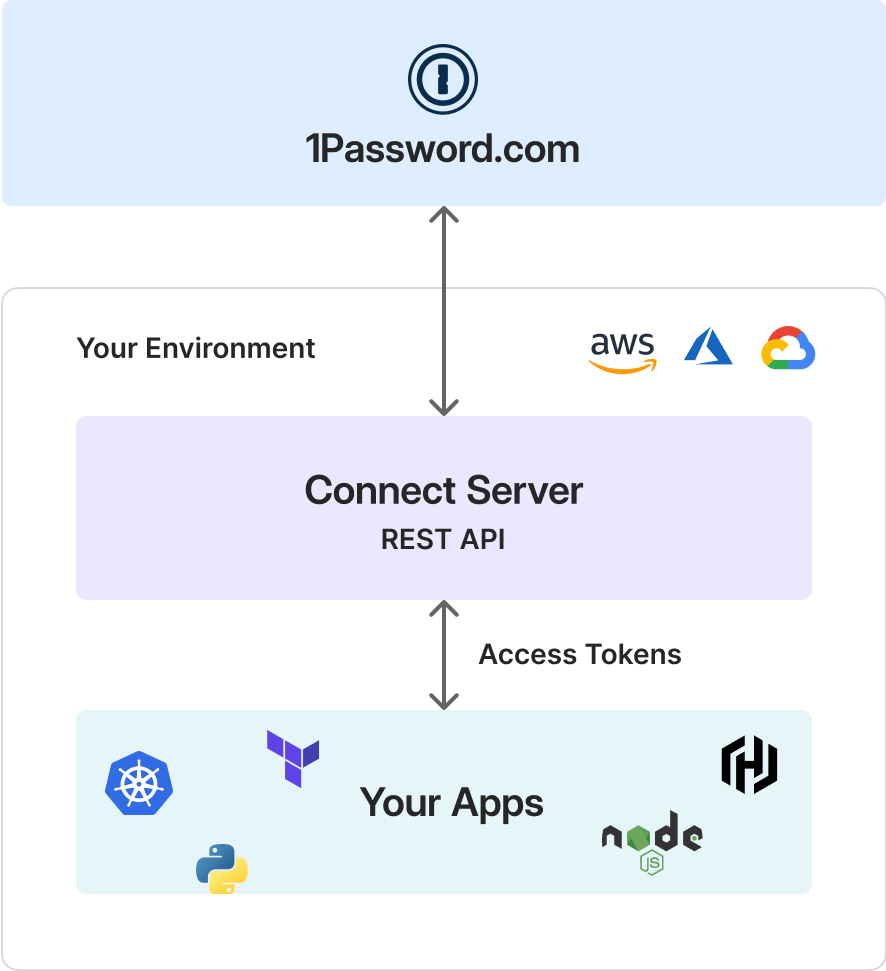
1Password Connect Servers allow you to securely access your 1Password items and vaults in your company's apps and cloud infrastructure using a private REST API.</p>

    <p>Because Connect servers cache your data in your infrastructure, they allow unlimited re-requests after the server fetches your secrets.</p>

    <p>The only request quotas that apply to Connect servers are the internal rate limits 1Password employs to keep our services stable and available. These only apply when a Connect server fetches secrets for the first time, like when the Connect server starts.</p>

    <p>You can integrate a Connect server into your infrastructure and communicate with it over HTTP using one of the Connect SDK libraries (such as [Go](https://github.com/1Password/connect-sdk-go), [Python](https://github.com/1Password/connect-sdk-python), or [JavaScript](https://github.com/1Password/connect-sdk-js)) or using a custom integration.</p>

    <Tip>
      **Not sure if Connect servers are for you?**

      See the [Secrets Automation comparison table](/secrets-automation/#comparison).
    </Tip>
  </div>

  <div>
    <Frame>
      <img alt="The Connect server is part of your environment, and communicates to Your Apps using access tokens and a REST API." src="https://mintcdn.com/ab-634991b8/P8nNS8jHoY1I7R9r/static/img/connect-diagram.png?fit=max&auto=format&n=P8nNS8jHoY1I7R9r&q=85&s=70b961d4ea5fa816b3da9b73907f09eb" width="886" height="971" data-path="static/img/connect-diagram.png" />
    </Frame>
  </div>
</CardGroup>

## Use cases

You can use 1Password Connect to accomplish a variety of tasks:

<CardGroup cols={2}>
  <HighlightCard title="Reduce latency and downtime" preheader="Availability" useButton={false}>
    Deploy a Connect server in your infrastructure, giving you complete control. Self-hosting also reduces latency and has security benefits, as only your services can interact with Connect.

    <br />

    <br />

    You can also deploy redundant Connect servers to further increase availability.
  </HighlightCard>

  <HighlightCard title="Load secrets into CI/CD pipelines" link={{ to: "/ci-cd/", text: "Learn more" }} preheader="CI/CD pipelines" useButton={true}>
    Use a Connect server to automatically access your secrets in continuous integration environments.

    <br />

    <br />

    You can use a Connect server to use 1Password items in your CI/CD pipeline for testing and deploying code. Doing so maintains security and avoids using sensitive information with a personal account.
  </HighlightCard>

  <HighlightCard title="Provision web services with secrets" preheader="Web services" useButton={false}>
    Use a Connect server to provision an account with a secret stored in 1Password.

    <br />

    <br />

    If a web service needs access to a database (and the credentials for the database are in 1Password), you can use a Connect server to provision an account with the needed secret and allow the web service to access the secret during test runs.
  </HighlightCard>

  <HighlightCard title="Secure infrastructure secrets" preheader="Infrastructure secrets" useButton={false}>
    Use a Connect server to make sure infrastructure secrets aren't tied to a personal user account.
  </HighlightCard>

  <HighlightCard title="Automate secrets management" link={{ to: "/connect/manage-connect", text: "Learn more" }} preheader="Secrets management" useButton={true}>
    Use a Connect server to automate scripts to manage secrets.

    <br />

    <br />

    Using a Connect server helps you implement the principle of least privilege and avoid the limitations of personal accounts (for example, SSO and MFA requirements).
  </HighlightCard>

  <HighlightCard title="Streamline development workflows" preheader="Development workflows" useButton={false}>
    Use a Connect server to securely share and manage infrastructure secrets to streamline development workflows.
  </HighlightCard>

  <HighlightCard title="Secure Kubernetes environments" link={{ to: "/k8s/integrations", text: "Learn more" }} preheader="Integration" useButton={true}>
    Use a Connect server to access and sync 1Password secrets in a Kubernetes environment.
  </HighlightCard>
</CardGroup>

## Get started

Learn how to get started and how to create, manage, and integrate with Connect servers.

<Link className="button button--primary" to="/connect/get-started">
  {"Get started"}
</Link>
