> ## Documentation Index
> Fetch the complete documentation index at: https://www.1password.dev/llms.txt
> Use this file to discover all available pages before exploring further.
# Sync secrets from 1Password to AWS Secrets Manager (beta)
export const BetaBadge = ({content}) => {
if (content) {
return
Beta
;
}
return <>
Beta
;
};
export const Small = ({children}) => {
return {children};
};
Use the 1Password AWS Secrets Manager integration to centralize secrets management and simplify your workflow. [Create an environment with variables in 1Password](/environments/), then securely sync those secrets to AWS Secrets Manager.
**Share your feedback**
To share your thoughts about the integration with us, submit your feedback using our [feedback form](https://forms.gle/3NUc7g3ywL4moksD7).
## Requirements
Before you can use the 1Password AWS Secrets Manager integration, you'll need to:
1. [Sign up for 1Password.](https://1password.com/pricing/password-manager)
2. [Install the 1Password desktop app.](https://1password.com/downloads)
3. [Create an environment](/environments#create-an-environment) to use with AWS Secrets Manager.
4. Have an AWS account with the ability to create IAM resources.
## Set up the AWS Secrets Manager integration
### Step 1: Navigate to the AWS configuration page in 1Password
1. In the 1Password desktop app, select **Developer** in the sidebar, then select **View Environments**.
2. Find the name of the environment you created for AWS Secrets Manager and select **View environment**.
3. Go to the **Destinations** tab, then select **Configure destination** for AWS Secrets Manager.
This opens the AWS Secrets Manager configuration page, where you can set up the integration to sync the environment from 1Password to AWS Secrets Manager.
### Step 2: Register the 1Password Secrets Sync SAML provider
Authentication to your AWS account happens through SAML. You'll need to register the 1Password Secrets Sync SAML provider within your AWS account.
#### 2.1: Download the SAML metadata from 1Password
On the AWS Secrets Manager configuration page in 1Password, select **Download SAML metadata**. This will download a `saml-metadata.xml` file to your Downloads folder.
#### 2.2 Add the SAML provider in AWS
1. [Sign in to the AWS Management Console ](https://console.aws.amazon.com/) and navigate to the [Identity and Access Management (IAM) console. ](https://console.aws.amazon.com/iam/)
2. From the navigation pane, select **Identity providers**, then select **Add provider**.
3. Configure the following provider details:
* **Provider type**: Select **SAML** as the provider type, if it's not already selected.
* **Provider name**: Enter the name you want to use for the identity provider. For example: `1PasswordSecretsSync`.
* **Metadata document**: Select **Choose file**, then select the **`saml-metadata.xml`** file you saved to your Downloads folder in the previous step.
4. Scroll to the bottom of the page and select **Add provider**. You should see a message that says the provider was added.
#### 2.3 Add the SAML provider ARN to the 1Password configuration page
1. In the [identity providers area of the IAM console ](https://console.aws.amazon.com/iam/home#/identity_providers), search the list for the provider you added.
2. Select the provider name to open its details.
3. Copy the **ARN** from the **Summary** section.
4. In the 1Password app, paste the ARN you copied from AWS into the **SAML provider ARN** field.
### Step 3: Create an IAM policy for managing secrets
1. From the navigation pane of the [AWS IAM console ](https://console.aws.amazon.com/iam/), select **Policies**, then select **Create policy**.
2. Select **JSON** as the policy editor.
3. Copy the following permission statement and paste it into the policy editor window, replacing any default content already in the editor:
```json theme={null}
{
"Version": "2012-10-17",
"Statement": [
{
"Effect": "Allow",
"Action": [
"secretsmanager:DescribeSecret",
"secretsmanager:RestoreSecret",
"secretsmanager:PutSecretValue",
"secretsmanager:CreateSecret",
"secretsmanager:DeleteSecret",
"secretsmanager:TagResource",
"secretsmanager:UpdateSecret"
],
"Resource": "*"
}
]
}
```
4. Select **Next**.
5. On the "Review and create" page, enter a name for the policy in the **Policy name** field. For example: `1PasswordSecretsSync`.
You can optionally add a description in the **Description** field.
6. Scroll to the bottom of the page and select **Create policy**. You should see a message that says the policy was created.
### Step 4: Create an IAM role for the sync integration
#### 4.1: Create the IAM role in AWS
1. From the navigation pane of the [AWS IAM console ](https://console.aws.amazon.com/iam/), select **Roles**, then select **Create role**.
2. From the list of trusted entity types, select **SAML 2.0 federation**.
3. Select the **SAML 2.0–based provider** menu, then select the SAML provider you created in [step 2](#2-2-add-the-saml-provider-in-aws).
4. In the Condition section, select **Add condition** and configure the following fields:
* **Key**: Select **SAML:sub** from the menu.
* **Condition**: Select **StringEquals** from the menu.
* **Value**: Go back to the 1Password configuration page and select **Copy SAML subject**. Then paste the SAML subject in the **Value** field.
5. Select **Next**.
6. Select the checkbox next to the policy you just created, then scroll to the bottom of the page and select **Next**.
Only select the checkbox and not the name of the policy itself.
7. On the "Name, review, create" page, enter a name for the IAM role in the **Role name** field.
You can optionally add a description in the **Description** field.
8. Scroll to the bottom of the page and select **Create role**. You should see a message that says the policy was created.
#### 4.2 Add the IAM role ARN to the 1Password configuration page
1. In the [Roles area of the IAM console ](https://console.aws.amazon.com/iam/home#/roles), search the list for the role you added.
2. Select the role name to open its details.
3. Copy the **ARN** from the **Summary** section.
4. In the 1Password app, paste the ARN you just copied from AWS into the **IAM role ARN** field.
### Step 5: Configure the target region and secret name in 1Password
1. In the 1Password app, find the **Target region** field in the configuration page. Enter the AWS Secrets Manager region where you want to sync your Environment. For example: **`us-east-1`** or **`eu-central-1`**.
If you're not sure what region your account uses, [go to the AWS console ](https://console.aws.amazon.com/) and check which region is displayed in the URL. For example: `https://us-east-1.console.aws.amazon.com/console/home/`.
2. 1Password automatically populates the **Target secret name** field with the name of your environment.
You can edit this field if you want to change the name of the secret, or you can edit the name of the secret in AWS later. AWS Secrets Manager does not allow duplicate names, so make sure it’s unique.
3. (Optional) If you use a custom KMS key with AWS Secrets Manager, you can enter [the key's ID or ARN ](https://docs.aws.amazon.com/kms/latest/developerguide/find-cmk-id-arn.html) in the **KMS key ID** field. AWS will then encrypt your secrets with this key.
If you set a value for this field, make sure the IAM role has the [required KMS permissions. ](https://docs.aws.amazon.com/secretsmanager/latest/userguide/security-encryption.html)
### Step 6: Create the AWS Secrets Manager integration in 1Password
1. Review the configuration details in 1Password.
2. When you've finished, select **Create integration** in the 1Password app.
### Step 7: Test the connection and enable the integration in 1Password
You should now see a Destination card for AWS Secrets Manager. Select **Test connection** on the card to test the connection to AWS.
This creates and immediately deletes a placeholder value in AWS Secrets Manager, to ensure the correct permissions have been granted for the sync integration.
If everything is set up correctly and the test is successful, select the toggle to enable the integration and start syncing to AWS Secrets Manager.
### Step 8: Sync your secrets from 1Password to AWS
After you enable the AWS Secrets Manager integration, any variables saved in your Environment will be synced to AWS Secrets Manager.
With the secrets synced to AWS Secrets Manager, you can use one of the [methods provided by AWS ](https://docs.aws.amazon.com/secretsmanager/latest/userguide/retrieving-secrets.html) to load the secrets into your application or workload on AWS.
## How the integration works
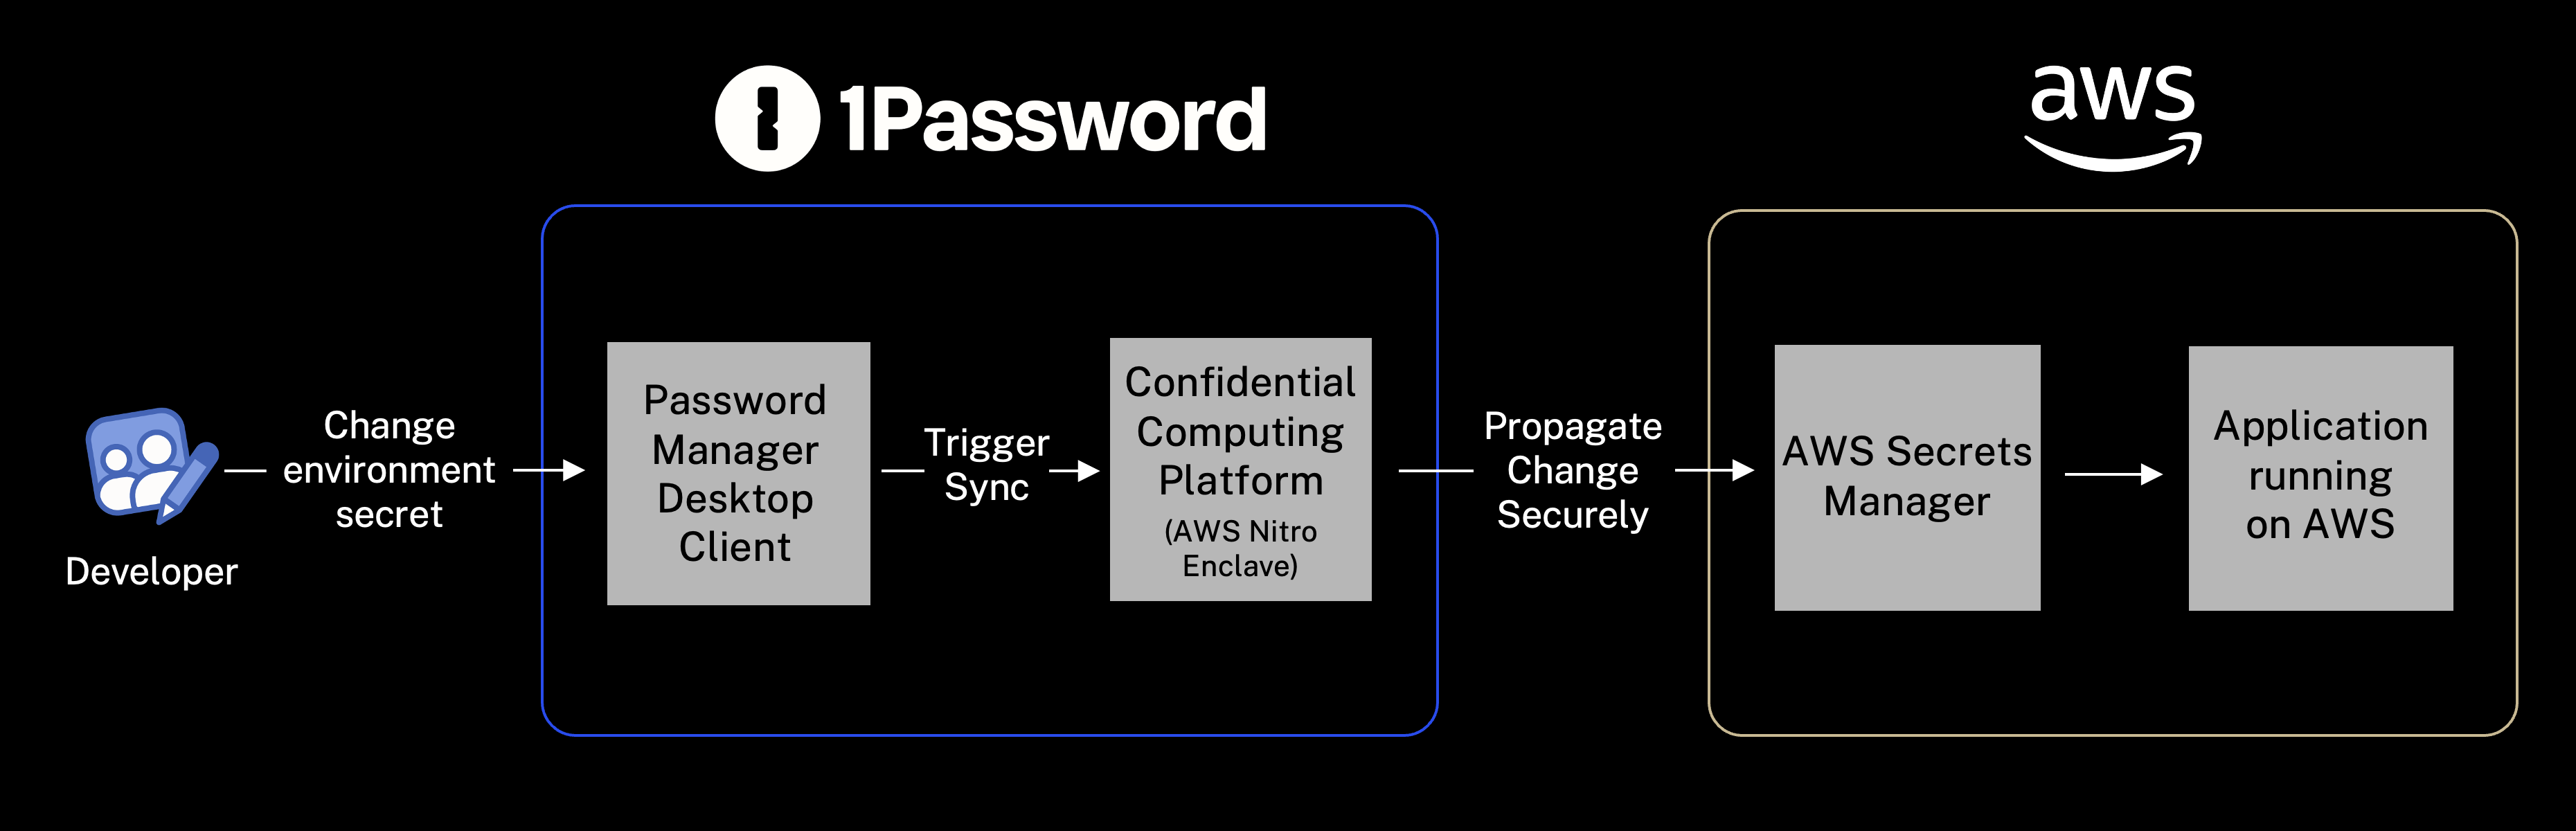
The secrets sync integration runs on 1Password's [Confidential Computing platform ](https://blog.1password.com/confidential-computing/), leveraging [AWS Nitro Enclaves ](https://docs.aws.amazon.com/enclaves/latest/user/nitro-enclave.html), to ensure a reliable, always-on sync to AWS Secrets Manager.
This allows you to set up the integration once per environment, only requiring AWS credentials to create the IAM resources. After the integration is set up, you can invite team members to edit the environment in 1Password without needing to provide AWS credentials to each person.
Learn more about some [limitations of the integration](#limitations).
## Manage the integration
### Update your environment secrets
If you need to add, update, or remove any environment variables, [make the changes in your 1Password Environment](/environments#manage-an-environment), then save your changes to trigger another sync from 1Password to AWS Secrets Manager.
### Stop using the integration
You can disable the AWS Secrets Manager integration to temporarily stop syncing your environment secrets from 1Password to AWS, or delete the integration to remove it.
In the 1Password desktop app, navigate to the environment you're using with AWS Secrets Manager and select the **Destinations** tab. Toggle the switch on the AWS Secrets Manager card to **Disabled** to stop syncing your environment. Or select the vertical ellipses > **Delete destination** to remove the integration.
## Troubleshooting
| Error | Troubleshooting steps |
| --------------------------------------------------------------------------------------------- | --------------------------------------------------------------------------------------------------------------------------------------------------------------------------------------------------------------------------------------------------------------------------------------------------------------------------------------------------------------------------- |
| The IAM role doesn't have the necessary permissions to manage secrets in AWS Secrets Manager. | Check the policy attached to your IAM role in AWS and make sure the role's IAM policy is [configured correctly](#step-3-create-an-iam-policy-for-managing-secrets). |
| The sync integration failed to assume the IAM role. | Make sure that the [SAML provider is registered correctly](#step-2-register-the-1password-secrets-sync-saml-provider) and that the [IAM role](#step-4-create-an-iam-role-for-the-sync-integration) has the right [trust policy attached](#step-3-create-an-iam-policy-for-managing-secrets). |
| There's an outage or internal error within the AWS platform. | [Check the AWS Health Dashboard ](https://docs.aws.amazon.com/health/latest/ug/aws-health-account-views.html) for any events affecting AWS services in your account and try again later. [Contact 1Password support](mailto:support@1password.com) if the problem persists. |
| The KMS key is invalid or can’t be used. | [Verify the KMS key exists in AWS ](https://docs.aws.amazon.com/kms/latest/developerguide/viewing-keys.html) and that it has an IAM policy that allows it to be used with [AWS Secrets Manager. ](https://docs.aws.amazon.com/secretsmanager/latest/userguide/security-encryption.html) |
| The AWS Secrets Manager quota has been reached. | Try again later or remove resources to stay within the [AWS Secrets Manager quotas. ](https://docs.aws.amazon.com/secretsmanager/latest/userguide/reference_limits.html) |
| The environment exceeds the maximum size allowed in AWS Secrets Manager (64 KB). | [Create additional environments](/environments#create-an-environment) so you can split the large environment into multiple smaller environments. Then set up a separate integration for each one so all your secrets are synced. |
| The SAML subject isn't set correctly in the IAM role's trust policy. | [Update the IAM role’s trust policy ](https://docs.aws.amazon.com/IAM/latest/UserGuide/id_roles_update-role-trust-policy.html) to set the correct SAML subject as the `saml:sub` condition. |
| A secret with the configured name already exists in AWS Secrets Manager. | [Set a different target secret name](#step-5-configure-the-target-region-and-secret-name-in-1password) on the configuration page in 1Password, or [delete the secret ](https://docs.aws.amazon.com/secretsmanager/latest/userguide/manage_delete-secret.html) in AWS Secrets Manager that uses the same name. |
If you encounter problems that you can't resolve with these steps, try [deleting the integration](#stop-using-the-integration) and setting it up again. Or [contact 1Password support](mailto:support@1password.com) for more help.
## Limitations
There are some limitations to consider if you use the beta integration.
* The integration supports unidirectional (one-way) syncing from 1Password to AWS Secrets Manager. Changes made to environment secrets in AWS Secrets Manager won't be synced to 1Password.
* If you have environment secrets in AWS Secrets Manager that require auto-rotation, you should continue to manage them there. This will prevent environment secrets becoming out of sync between AWS and 1Password.
* It's best practice to maintain one definitive copy of a secret in 1Password, either as a 1Password item or as a variable in a 1Password environment. Keeping multiple copies of the same secret could lead to different versions becoming out of sync.
* There's a 64KB size limit for environments synced to AWS Secrets Manager. An example of where you might run into this limit is if you're defining environment variables for a monolithic application. In this scenario, you could split variables out into separate environments, each with it's own sync integration.
## Learn more
* [1Password Environments](/environments)
* [Access secrets from 1Password through local `.env` files](/environments/local-env-file)
* [Workflow: Secure your deployments](/get-started/secure-deployment)
* [Workflow: Secure your developer secrets](/get-started/secure-developer-secrets)