> ## Documentation Index
> Fetch the complete documentation index at: https://www.1password.dev/llms.txt
> Use this file to discover all available pages before exploring further.
# Tutorial: Get started with 1Password SDKs and 1Password Service Accounts
export const CodeResult = ({children, resultLang, wrap, expandable}) => {
const parseChildren = () => {
let language = "text";
let codeContent = "";
const extractText = node => {
if (typeof node === "string") {
return node;
}
if (Array.isArray(node)) {
return node.map(extractText).join("");
}
if (node?.props?.children) {
return extractText(node.props.children);
}
return "";
};
const extractLanguage = node => {
if (!node) return null;
if (node.props?.className) {
const className = node.props.className;
const langMatch = className.match(/language-(\w+)/);
if (langMatch) {
return langMatch[1];
}
}
if (node.props?.["data-language"]) {
return node.props["data-language"];
}
if (node.props?.language) {
return node.props.language;
}
return null;
};
if (typeof children === "string") {
codeContent = children;
} else if (Array.isArray(children)) {
codeContent = extractText(children);
for (const child of children) {
const detectedLang = extractLanguage(child);
if (detectedLang) {
language = detectedLang;
break;
}
}
} else if (children?.props) {
const detectedLang = extractLanguage(children);
if (detectedLang) {
language = detectedLang;
}
codeContent = extractText(children);
}
const parts = codeContent.split("#code-result");
if (parts.length < 2) {
return {
command: codeContent.trim(),
result: null,
language,
defaultOpen: false
};
}
const resultText = parts[1].trim();
const defaultOpen = resultText.startsWith("open");
const cleanResult = defaultOpen ? resultText.slice(4).trim() : resultText;
return {
command: parts[0].trim(),
result: cleanResult,
language,
defaultOpen
};
};
const {command, result, language, defaultOpen} = parseChildren();
const [isOpen, setIsOpen] = useState(defaultOpen);
if (!result) {
return children;
}
return
{}
{}
{isOpen &&
}
;
};
In this tutorial, you'll build a simple JavaScript application that securely fetches a secret from your 1Password account. In the process, you'll learn how to:
* Create a new test vault in your 1Password account.
* Create a service account that can only access the test vault.
* Save a secret in the test vault.
* Set up your project, and install and configure the 1Password JS SDK.
* Get a secret reference URI that points to the test secret you created.
* Build a simple application that takes the secret reference as input and outputs the actual secret.
This tutorial covers end-to-end setup for the [1Password JavaScript SDK](https://github.com/1Password/onepassword-sdk-js?tab=readme-ov-file#-get-started). Learn more about the [1Password Go SDK](https://github.com/1Password/onepassword-sdk-go?tab=readme-ov-file#-get-started) and the [1Password Python SDK](https://github.com/1Password/onepassword-sdk-python?tab=readme-ov-file#requirements).
## Prerequisites
1. [1Password subscription](https://1password.com/pricing/password-manager).
2. (Optional) [1Password desktop app](https://1password.com/downloads/).
3. Basic knowledge of JavaScript.
## Part 1: Set up a 1Password Service Account
In the first part of the tutorial, you'll create a vault and item in your 1Password account to use for testing, and set up a service account to authenticate the SDK.
### Step 1: Create a new vault
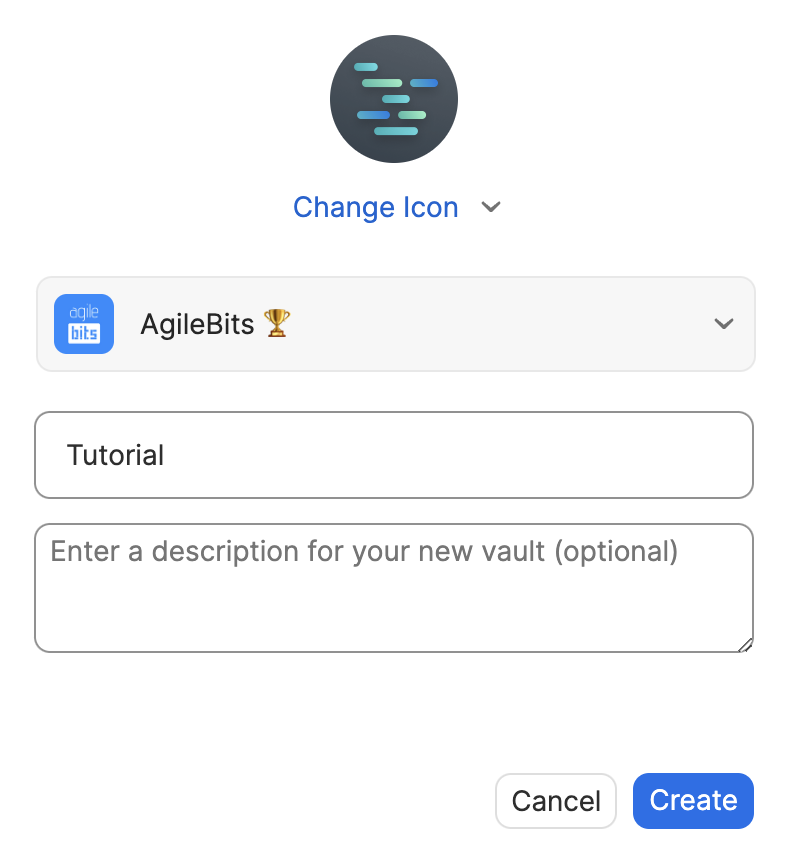
First, create a new vault named Tutorial. You'll scope your service account to this vault, so it can only access the test item you create for this tutorial.
1. Open and unlock the [1Password desktop app](https://1password.com/downloads/).
2. Select the plus icon in the sidebar next to your account name.
3. Enter `Tutorial` for the vault name, then select **Create**.
### Step 2: Create a service account
Next, create a [1Password Service Account](/service-accounts/get-started/). This is a token-based authentication method that you can scope to specific vaults and permissions, so your process only has the minimum required access to your account.
1. [Sign in](https://start.1password.com/signin) to your account on 1Password.com.
2. Select [**Developer**](https://start.1password.com/developer-tools/directory) in the sidebar. Or, if you already have active applications and services, select **Directory** at the top of the Developer page.
3. Under Access Tokens, select **Service Account**. If you don't see the option to create service accounts, ask your administrator to [give you access to create and manage service accounts](/service-accounts/manage-service-accounts#manage-who-can-create-service-accounts).
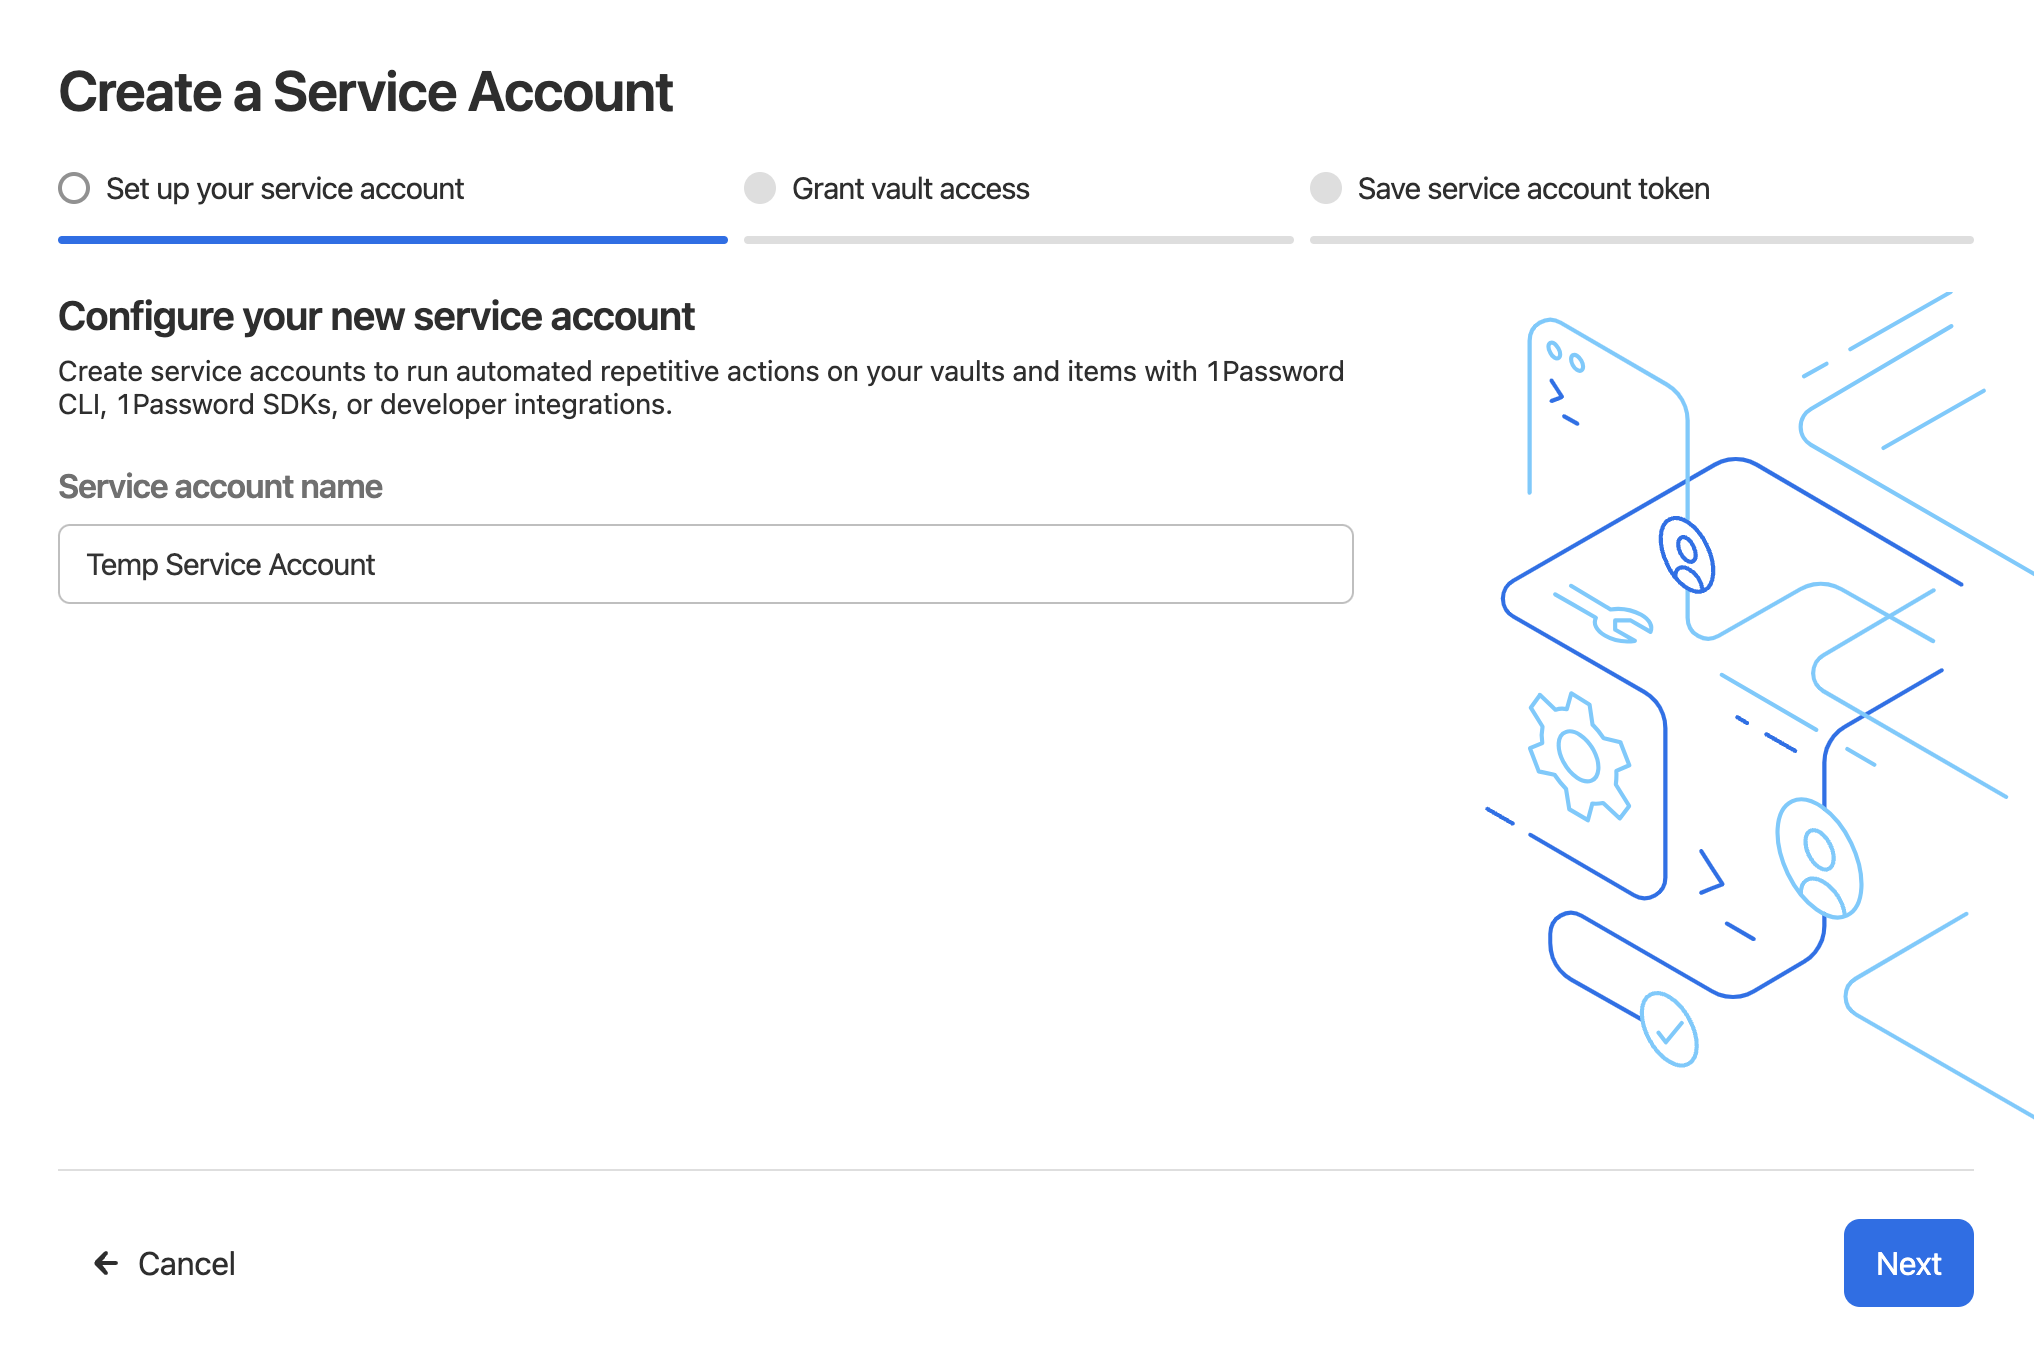
4. Give your service account a name. For this tutorial, use `Temp Service Account`.
5. Select **Next**.
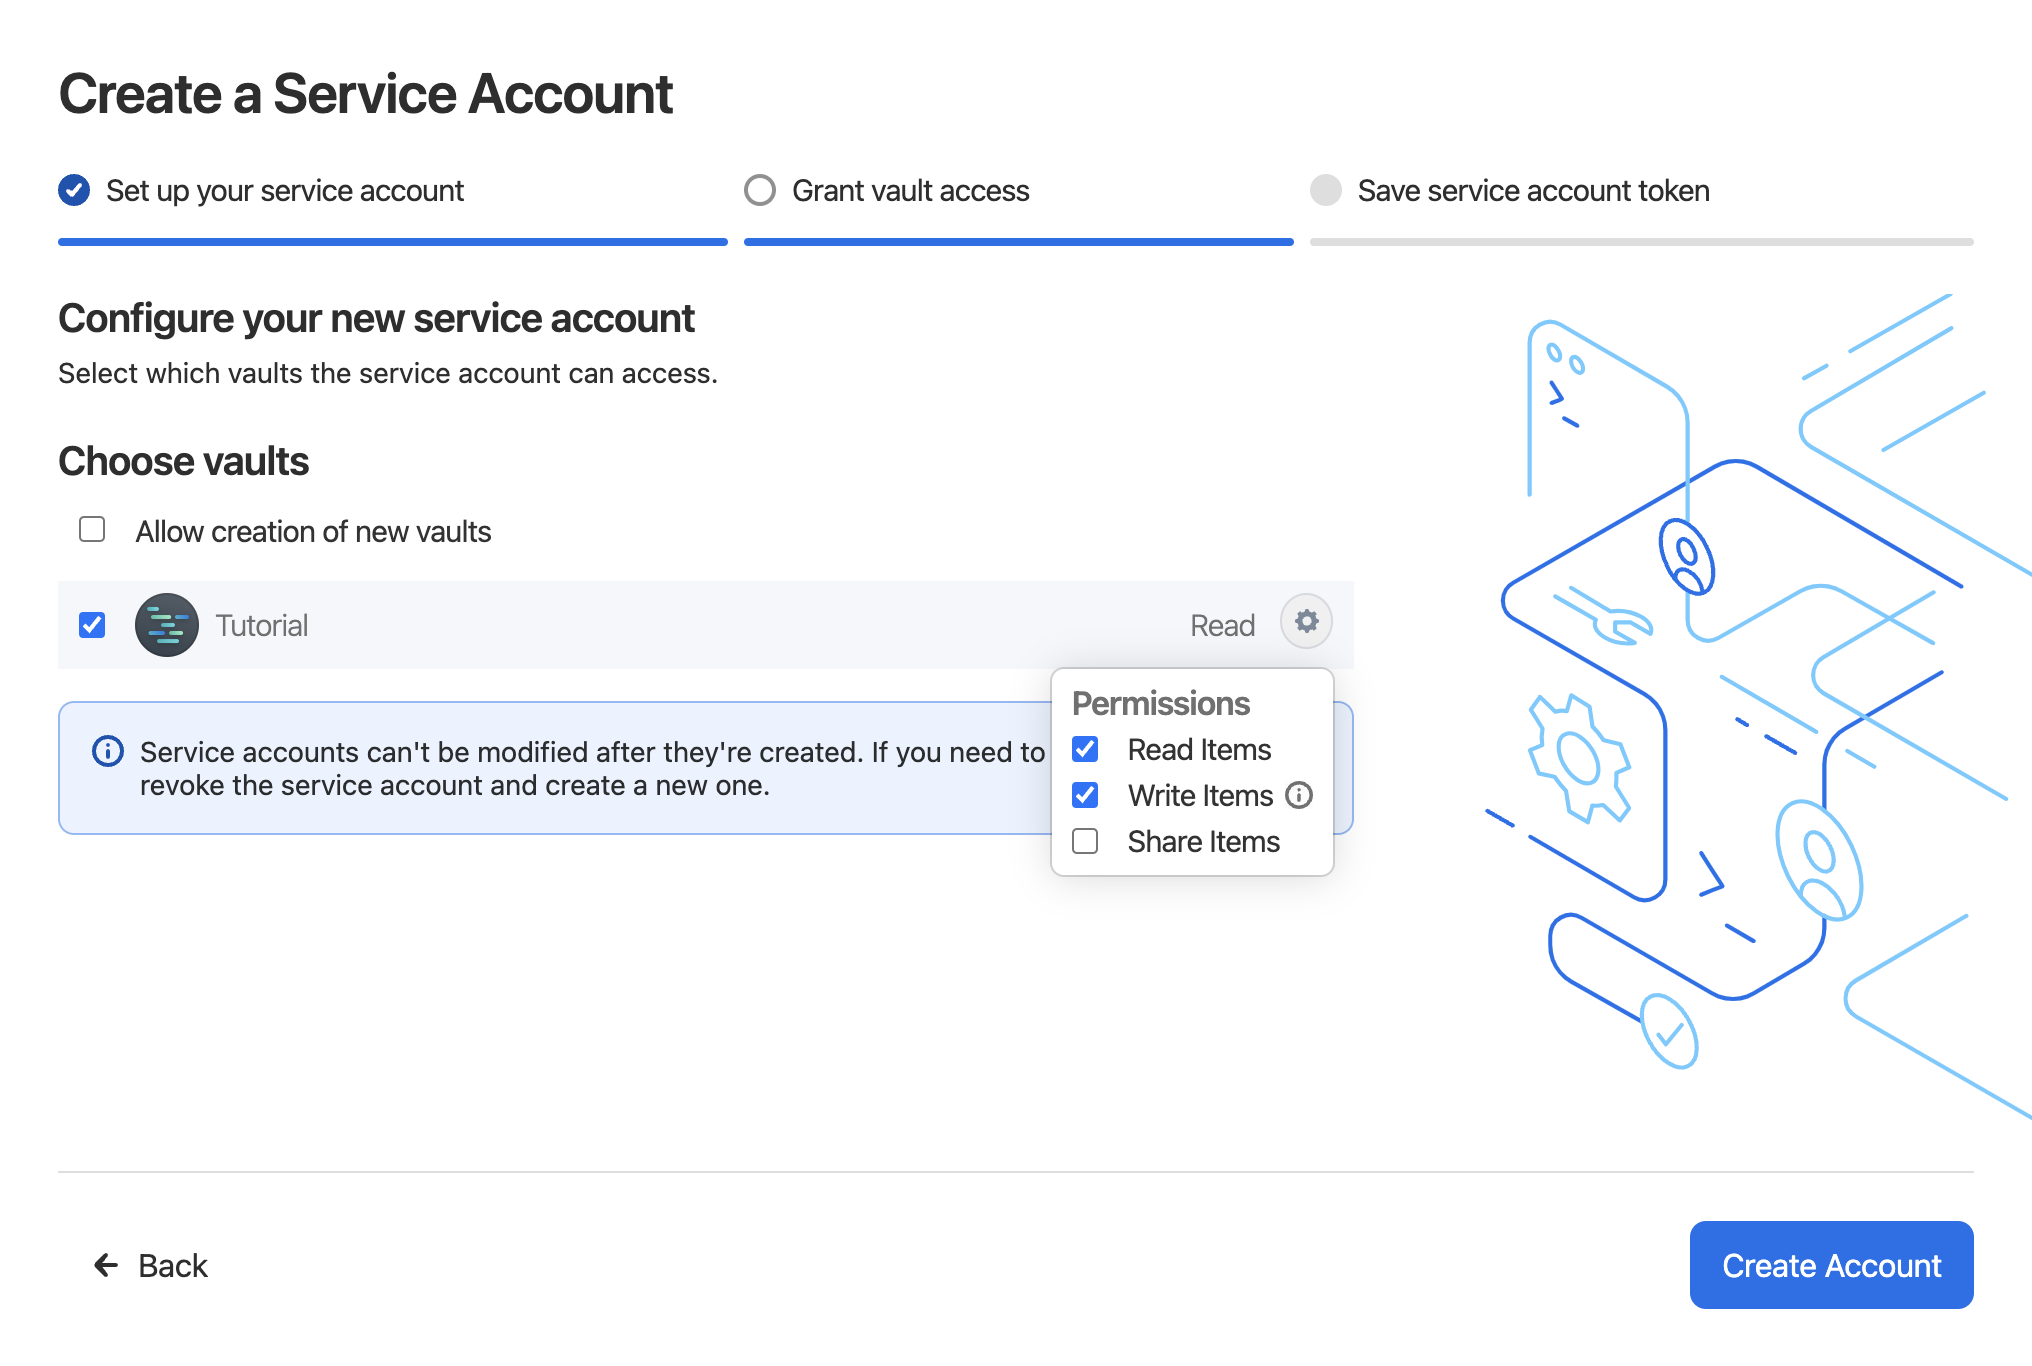
6. On the next screen, you'll see a list of your 1Password vaults. Select the **Tutorial** vault you created in the previous step, then select the gear icon next to it. In the permissions dropdown, check **Read Items** and **Write Items**.
7. Select **Create Account**.
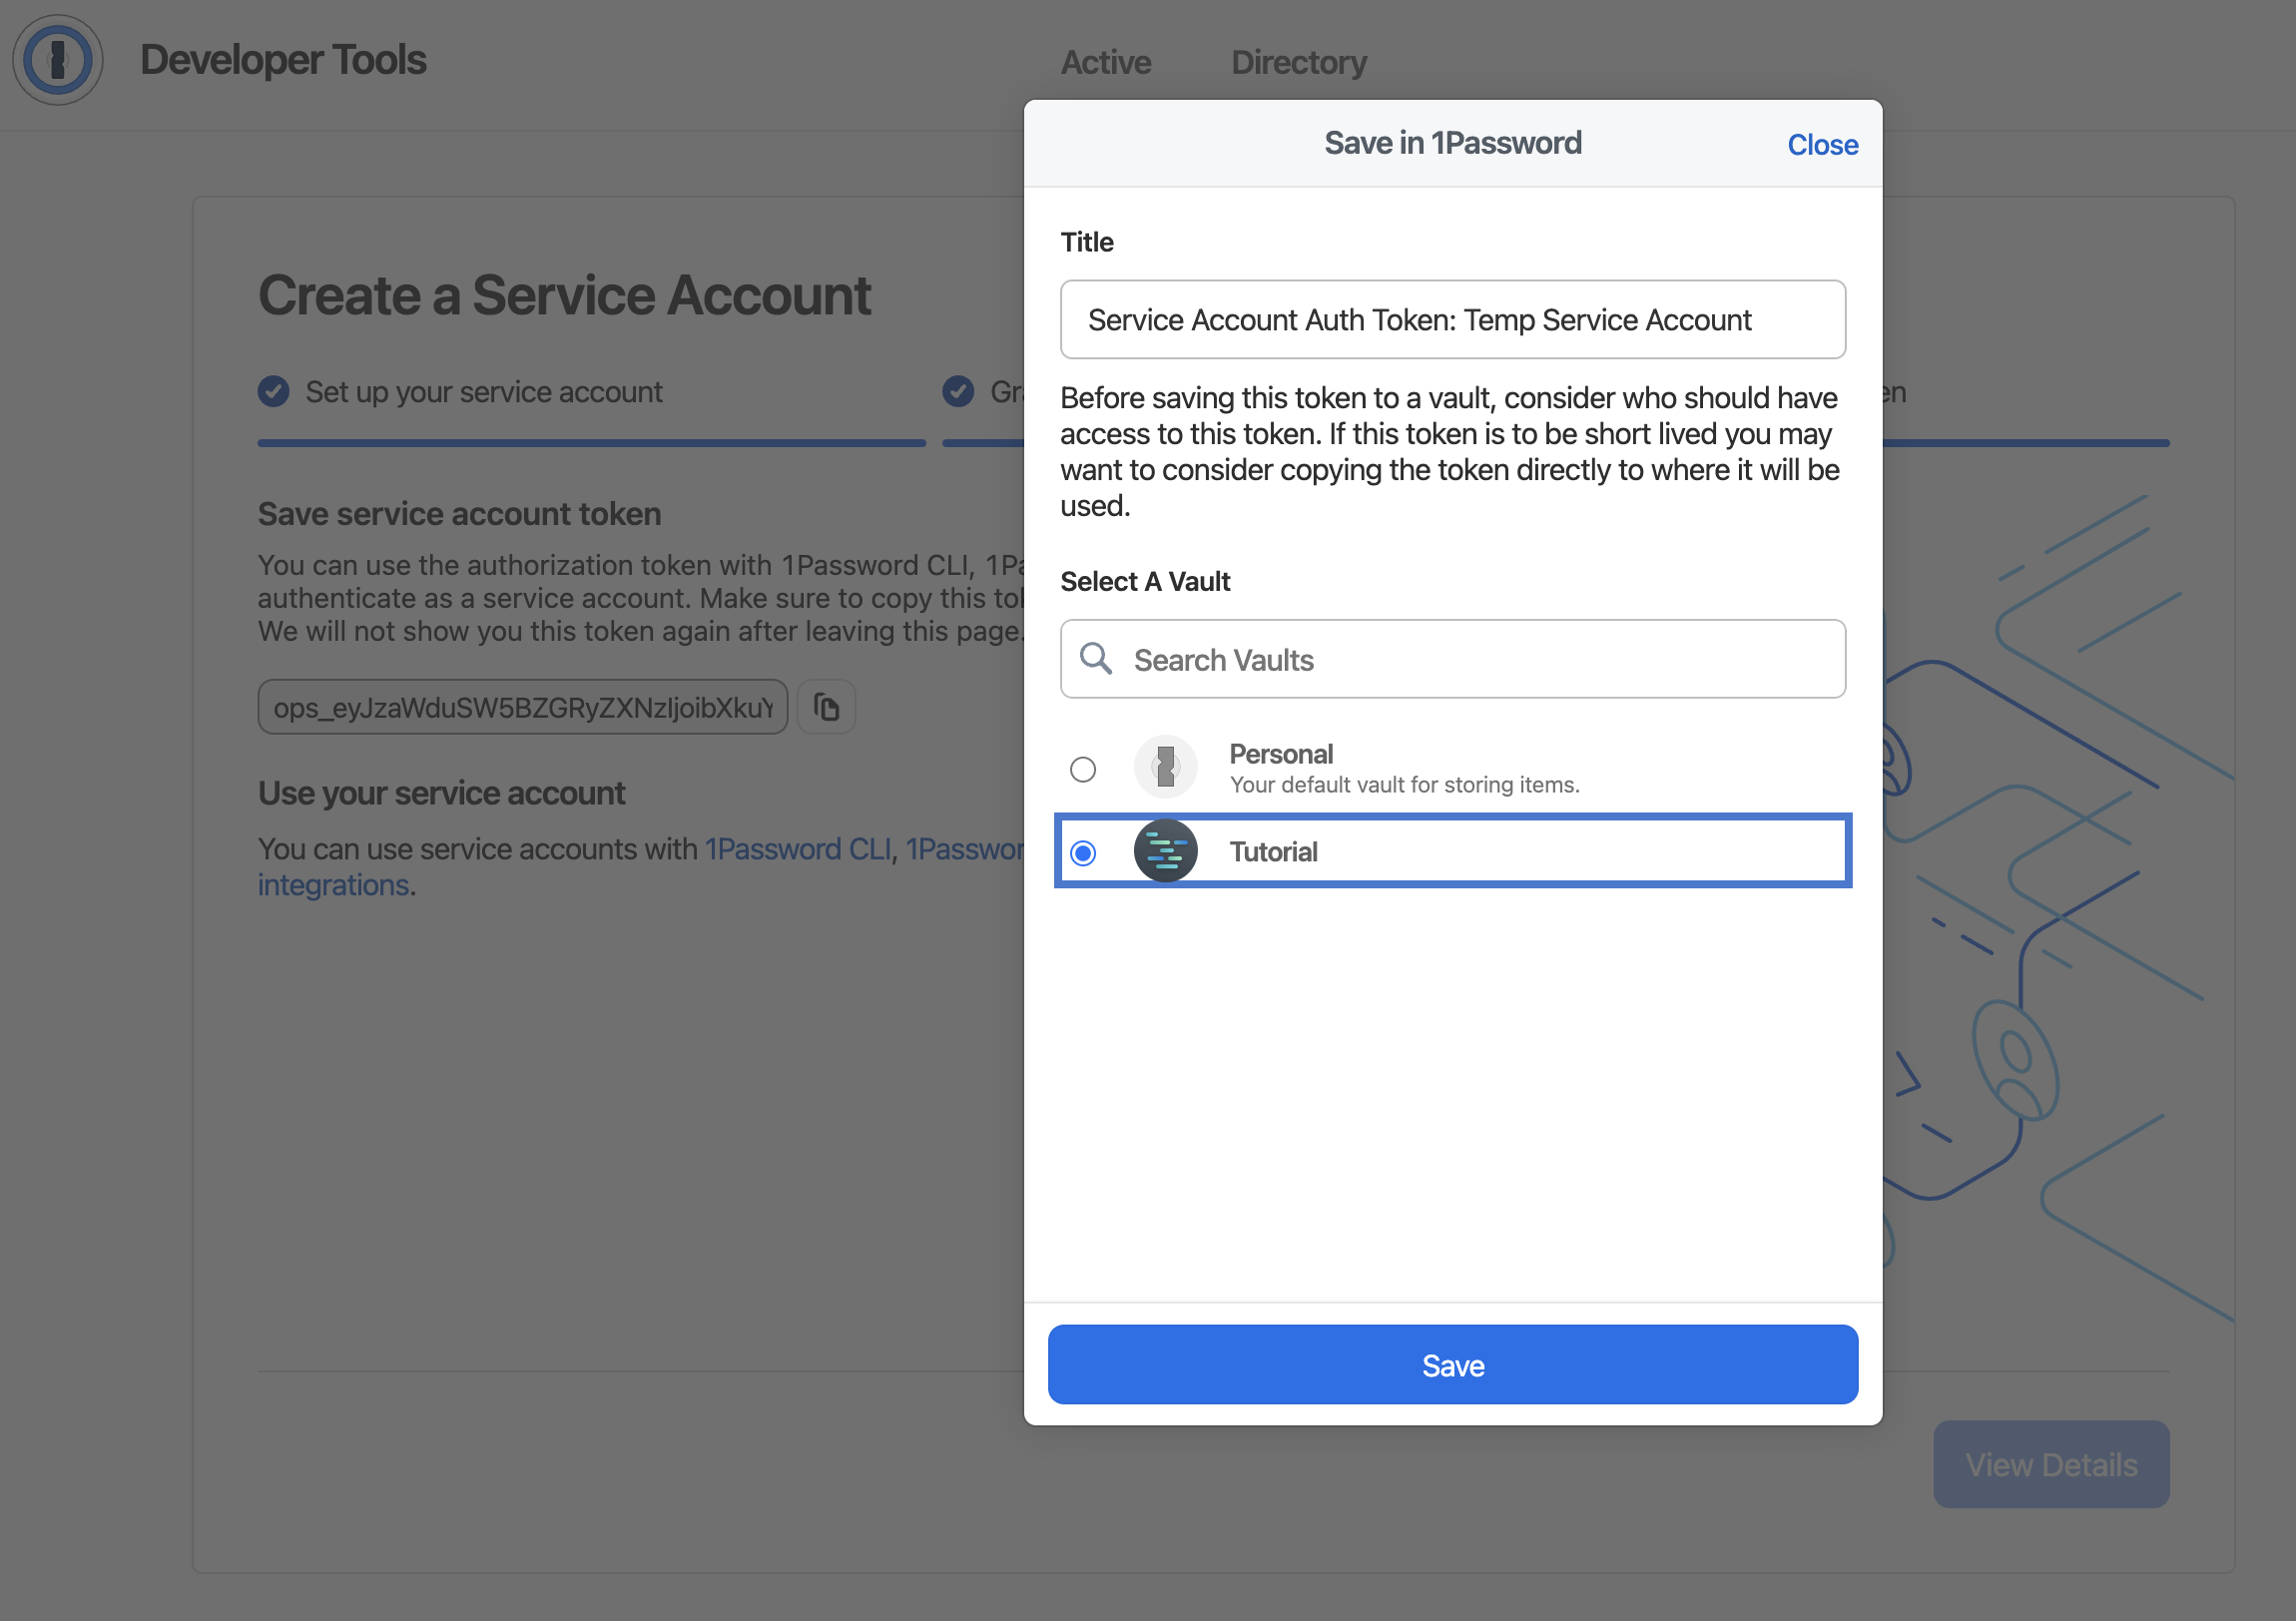
8. On the next screen, select **Save in 1Password**, then save your newly-created service account token in the Tutorial vault.
### Step 3: Create a secret to retrieve with the SDK
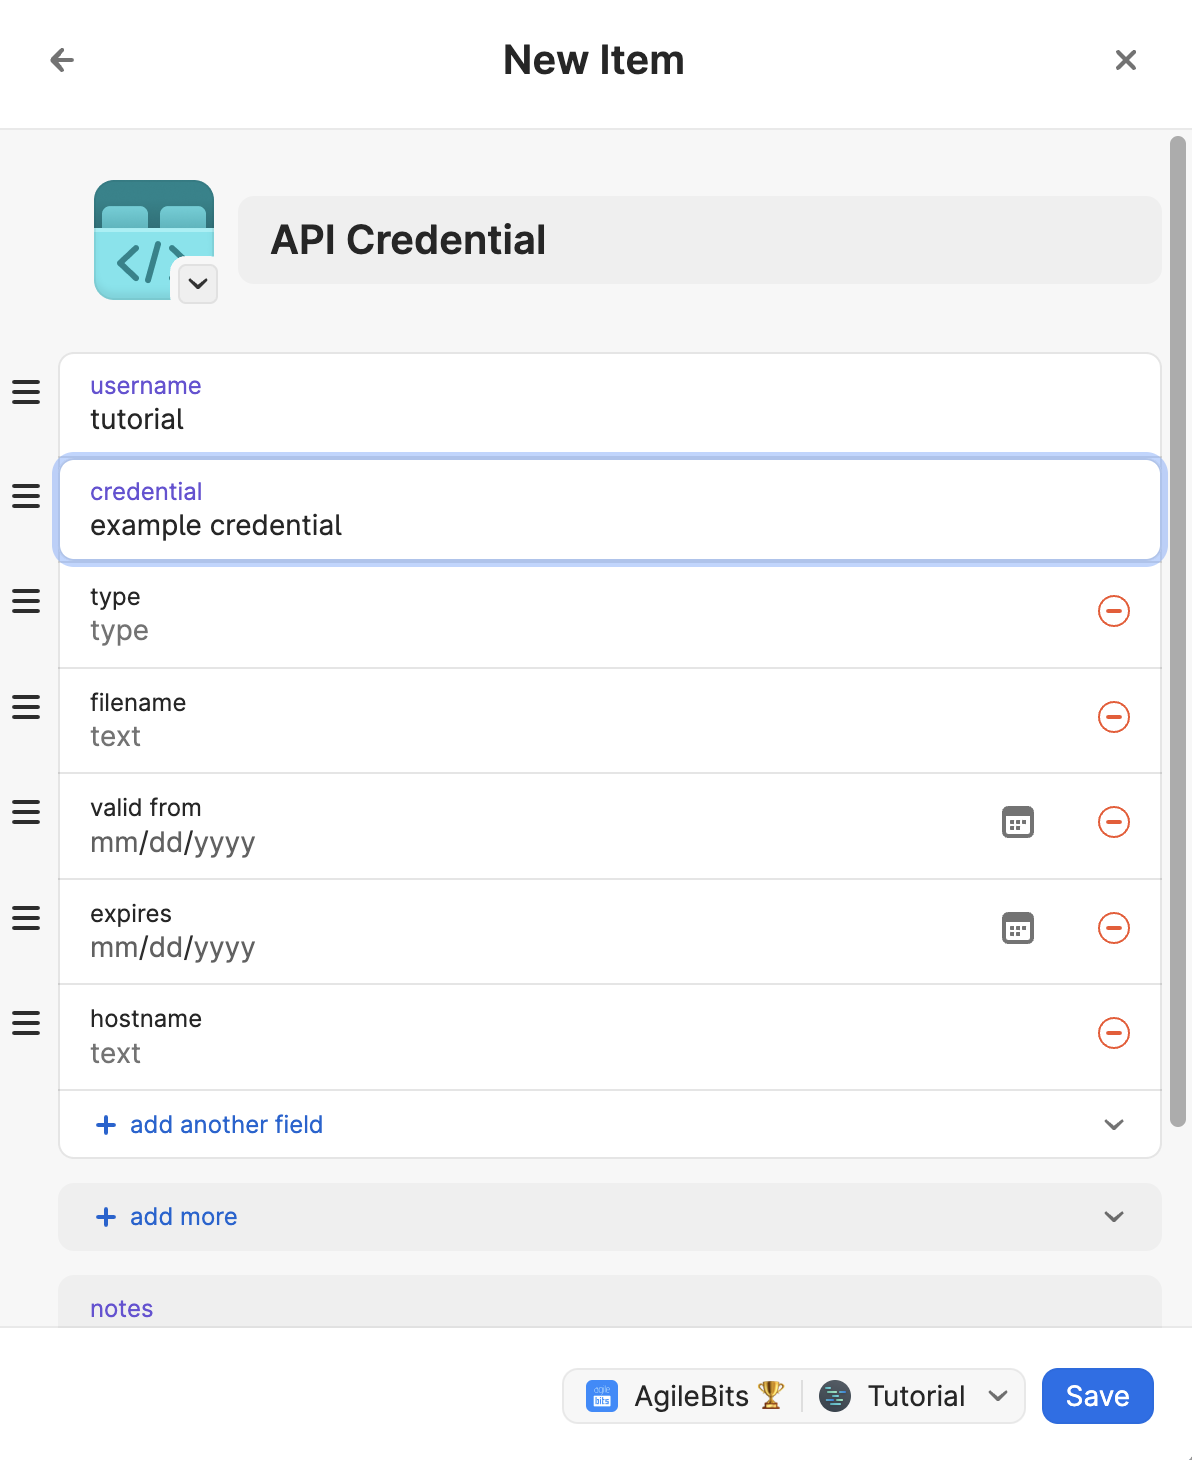
Next, create an example API credential item in the Tutorial vault. In the second half of the tutorial, you'll build a simple application to fetch the credential secret from this item.
1. Open and unlock the [1Password desktop app](https://1password.com/downloads/).
2. Select **+ New Item** to create a new item.
3. Select **API credential** for the item category.
4. For the purpose of this tutorial, enter `tutorial` for the username and `example credential` for the credential.
5. Select the Tutorial vault you created in step 1 from the dropdown next to the Save icon.
6. Select **Save** to create the item.
You should now see the API credential item in your Tutorial vault.
## Part 2: Install and configure a 1Password SDK
In this part of the tutorial, you'll create a new folder for your project, set up a NodeJS runtime environment in it, then install and configure the 1Password JavaScript SDK.
### Step 1: Set up a NodeJS runtime environment
Create a new folder for your project, then make sure you have NodeJS installed.
1. Open your terminal and create a new folder named Tutorial:
```shell theme={null}
mkdir Tutorial
```
2. Change directories to the Tutorial folder, then check to make sure you have NodeJS version 18 or later installed:
```shell theme={null}
cd Tutorial && node -v
#code-result
v20.16.8
```
If you don't see an existing NodeJS version, or if you have an earlier version installed, [learn how to install the latest version of NodeJS](https://nodejs.org/).
Then, initialize a NodeJS project in your Tutorial folder:
```shell theme={null}
npm init -y
#code-result
Wrote to /Users/wendy.appleseed/Tutorial/package.json:
{
"name": "Tutorial",
"version": "1.0.0",
"description": "",
"main": "index.js",
"scripts": {
"test": "echo \"Error: no test specified\" && exit 1"
},
"keywords": [],
"author": "",
"license": "ISC"
}
```
### Step 2: Add support for Modules
After you've initialized a NodeJS project for the tutorial, you'll need to edit the newly created `package.json` file to add support for Modules.
Open the `package.json` file in the Tutorial folder and add `"type": "module",` on a new line after `“main”:”index.js”` on line #5.
```json highlight={6} theme={null}
{
"name": "Tutorial",
"version": "1.0.0",
"description": "",
"main": "index.js",
"type": "module",
"scripts": {
"test": "echo \"Error: no test specified\" && exit 1"
},
"keywords": [],
"author": "",
"license": "ISC"
}
```
Save the file and exit.
### Step 3: Install the 1Password SDK
Finally, return to your terminal and install the 1Password JS SDK in the Tutorial folder:
```shell theme={null}
npm install @1password/sdk
```
## Part 3: Build a JS application to fetch a secret from 1Password
In this part of the tutorial, you'll build a simple JavaScript application to securely fetch your API credential secret from 1Password. Your application will authenticate to 1Password using the service account token you created in the previous section.
### Step 1: Import the SDK
1. Create a new file `index.js` in the Tutorial folder:
```shell theme={null}
touch index.js
```
2. Copy and paste the following code into it:
```
import sdk from "@1password/sdk";
// Creates an authenticated client.
const client = await sdk.createClient({
auth: process.env.OP_SERVICE_ACCOUNT_TOKEN,
// Set the following to your own integration name and version.
integrationName: "My 1Password Integration",
integrationVersion: "v1.0.0",
});
// Fetches a secret.
const secret = await client.secrets.resolve("op://vault/item/field");
```
3. Save the file and return to the terminal.
4. Run the code:
```shell theme={null}
node index.js
```
You'll see an error because you haven't yet imported your service account token into the environment. This is necessary for 1Password SDKs to be able to access your vaults.
```
node:internal/process/esm_loader:40
internalBinding('errors').triggerUncaughtException(
^
missing field `serviceAccountToken` at line 1 column 252
(Use `node --trace-uncaught ...` to show where the exception was thrown)
```
### Step 2: Import your service account token
To import your service account token:
1. Copy and paste the following into your terminal to export the token to the environment. Don't run the code yet.
```shell theme={null}
export OP_SERVICE_ACCOUNT_TOKEN=
```
```shell theme={null}
set -x OP_SERVICE_ACCOUNT_TOKEN
```
```powershell theme={null}
$Env:OP_SERVICE_ACCOUNT_TOKEN =
```
2. Open and unlock the [1Password desktop app](https://1password.com/downloads/).
3. Navigate to the Tutorial vault and open the item for your service account token.
4. Select the service account token credential to copy it.
5. Paste the token into your terminal to complete the export command, then press Enter.
```shell theme={null}
export OP_SERVICE_ACCOUNT_TOKEN=
```
```shell theme={null}
set -x OP_SERVICE_ACCOUNT_TOKEN
```
```powershell theme={null}
$Env:OP_SERVICE_ACCOUNT_TOKEN = ""
```
6. Run the following command to confirm you successfully set the environment variable:
```shell theme={null}
echo $OP_SERVICE_ACCOUNT_TOKEN
```
```shell theme={null}
echo $OP_SERVICE_ACCOUNT_TOKEN
```
```powershell theme={null}
$Env:OP_SERVICE_ACCOUNT_TOKEN
```
Now try running the code again:
```shell theme={null}
node index.js
```
You'll get a new error, in this case because you didn't provide a reference path to a secret. Think of this like a URL for a secret within your vault.
```
error resolving secret reference: no vault matched the secret reference query
```
### Step 3: Get a secret reference and resolve the secret
To fix the above error, get the [secret reference URI](/cli/secret-reference-syntax/) for your API credential and paste it into the code in place of the placeholder secret reference.
1. Open and unlock the [1Password desktop app](https://1password.com/downloads/).
2. Open the Tutorial vault and select the API credential item you created earlier.
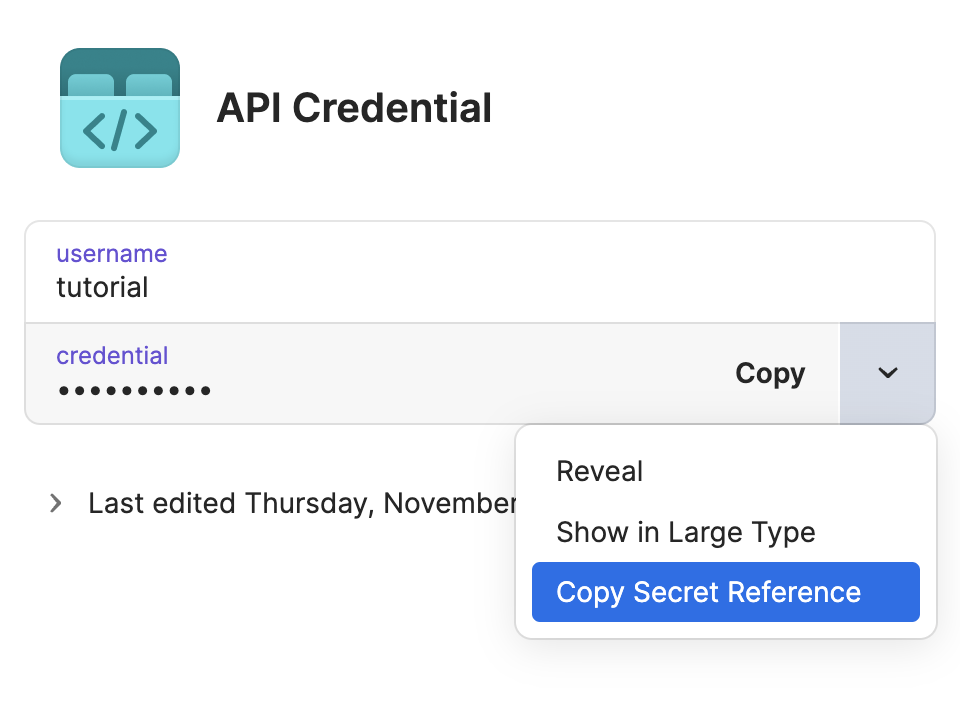
3. Select the down arrow next to the “credential" field, then select **Copy Secret Reference**.
4. In your `index.js` file, replace `op://vault/item/field` with the copied secret reference.
You can also get secret references with [1Password CLI](/cli/secret-reference-syntax/#with-1password-cli) and [1Password for VS Code](/cli/secret-reference-syntax/#with-1password-for-vs-code).
You should now see a secret reference that points to where the API credential is saved in your account:
```js highlight={12} theme={null}
import sdk from "@1password/sdk";
// Creates an authenticated client.
const client = await sdk.createClient({
auth: process.env.OP_SERVICE_ACCOUNT_TOKEN,
// Set the following to your own integration name and version.
integrationName: "My 1Password Integration",
integrationVersion: "v1.0.0",
});
// Fetches a secret.
const secret = await client.secrets.resolve("op://Tutorial/API Credential/credential");
```
Save the file and run the code again:
```shell theme={null}
node index.js
```
This time you won't see any errors, but you also won't see any output. You can fix this by adding some simple console logging.
Logging an example secret is useful for testing, but please don't do this with production code.
1. Reopen the `index.js` file and append the following line to output the secret to the console.
```shell theme={null}
console.log("The secret is: " + secret);
```
2. Save and close the file, then run the code for a final time:
```shell theme={null}
node index.js
```
You should now see your API credential returned:
```
The secret is: example credential
```
## Conclusion
In this tutorial, you learned how to create a 1Password vault, item, and service account, and how to access your newly-created vault and item using the 1Password JavaScript SDK.
Now that you have the basics down, you can extend this application to include other functions, like [updating the secret](/sdks/manage-items#update-an-item).
## Learn more
* [Get started with service accounts](/service-accounts/get-started/)
* [Get started with the 1Password JS SDK](https://github.com/1Password/onepassword-sdk-js?tab=readme-ov-file#-get-started)
* [Get started with the 1Password Go SDK](https://github.com/1Password/onepassword-sdk-go?tab=readme-ov-file#-get-started)
* [Get started with the 1Password Python SDK](https://github.com/1Password/onepassword-sdk-python?tab=readme-ov-file#requirements)
* [Workflow: Secure your deployments](/get-started/secure-deployment)
* [Workflow: Build integrations with 1Password](/get-started/build-integrations)
 5. Select **Next**.
6. On the next screen, you'll see a list of your 1Password vaults. Select the **Tutorial** vault you created in the previous step, then select the gear icon next to it. In the permissions dropdown, check **Read Items** and **Write Items**.
5. Select **Next**.
6. On the next screen, you'll see a list of your 1Password vaults. Select the **Tutorial** vault you created in the previous step, then select the gear icon next to it. In the permissions dropdown, check **Read Items** and **Write Items**.
 7. Select **Create Account**.
8. On the next screen, select **Save in 1Password**, then save your newly-created service account token in the Tutorial vault.
7. Select **Create Account**.
8. On the next screen, select **Save in 1Password**, then save your newly-created service account token in the Tutorial vault.
 ### Step 3: Create a secret to retrieve with the SDK
Next, create an example API credential item in the Tutorial vault. In the second half of the tutorial, you'll build a simple application to fetch the credential secret from this item.
### Step 3: Create a secret to retrieve with the SDK
Next, create an example API credential item in the Tutorial vault. In the second half of the tutorial, you'll build a simple application to fetch the credential secret from this item.