> ## Documentation Index
> Fetch the complete documentation index at: https://www.1password.dev/llms.txt
> Use this file to discover all available pages before exploring further.
# Advanced use cases
> Learn more about how to use the SSH agent for specific hosts, avoid authentication limits, and use multiple Git identities on the same machine.
## Gradual migration
### Mac & Linux
If you don't want to use the 1Password SSH agent for all your hosts right away, you don't have to. The 1Password SSH agent can run alongside another SSH agent, like the OpenSSH agent.
The SSH client config file (`~/.ssh/config`) allows you to provide different authentication details for different hosts. So, you can try the 1Password SSH agent with one or two hosts to start, then gradually migrate the rest when you're ready.
Here are a few examples of what your `~/.ssh/config` file could look like:
```toml theme={null}
# A host that uses the 1Password agent
Host raspberry-pi
HostName 192.168.12.34
User pi
IdentityAgent ~/.1password/agent.sock
# A host that uses a local private key file that isn't saved in 1Password
Host ec2-server
HostName 54.123.45.67
User ec2-user
IdentityFile ~/.ssh/ssh-key-not-on-1password.pem
```
```toml theme={null}
# By default, use the 1Password SSH agent for all hosts
Host *
IdentityAgent ~/.1password/agent.sock
# A host that uses a local private key file that isn't saved in 1Password
Host ec2-server
HostName 54.123.45.67
User ec2-user
IdentityFile ~/.ssh/ssh-key-not-on-1password.pem
IdentityAgent none
```
```toml theme={null}
# By default, use a local private key file that's not saved in 1Password
Host *
IdentityFile ~/.ssh/ssh-key-not-on-1password.pem
# Use the 1Password agent on a single host instead of the local key file
Host raspberry-pi
HostName 192.168.12.34
User pi
IdentityAgent ~/.1password/agent.sock
IdentityFile none
```
### Windows
No changes to the SSH configuration need to be made on Windows. Windows doesn't have the same flexibility with the `~/.ssh/config` file as macOS and Linux, because Microsoft OpenSSH listens to a fixed pipe `(\\.\pipe\openssh-ssh-agent)`. If you want to use the 1Password SSH agent on Windows, it will authenticate for all hosts.
## SSH server six-key limit
Use [SSH bookmarks](/ssh/bookmarks/) to match your SSH hosts with SSH keys and avoid server key limitations.
SSH agents work together with SSH clients by trying all public keys the agents manage, offering them one by one to SSH servers until the server acknowledges one that works. However, OpenSSH servers are configured by default to limit the amount of authentication attempts for an incoming SSH connection (`MaxAuthTries`) to six.
If your SSH client offers the SSH server a seventh key, the server will refuse the connection and you'll see this error message in your SSH client:
```text theme={null}
Too many authentication failures
```
Server administrators *can* increase the limit by setting `MaxAuthTries` in the [server's `/etc/ssh/sshd_config`](https://linux.die.net/man/5/sshd_config), but in many cases you can't (or don't want to) change this. Instead, you can specify which host should be matched to which SSH key.
### Match key with host
To avoid the `Too many authentication failures` error, your SSH client needs to know which SSH public key should be used with which host. This can be configured in the SSH config file by setting `IdentityFile` in a `Host` block to the public key you want use with that host.
You can configure [SSH Bookmarks](/ssh/bookmarks/) to automatically manage this for you.
Alternatively, you can manually edit your SSH config file:
1. In your 1Password app, select the **Download** button on the "Public key" field of the SSH item.
2. In your `~/.ssh/config` file, add an entry for the host you're connecting to and set `IdentityFile` to the path of the **public key** you just downloaded. The private key can stay in 1Password.
```toml theme={null}
Host github.com
IdentityFile ~/.ssh/public-key-downloaded-from-1password.pub
IdentitiesOnly yes
```
Now your SSH clients will know which key to use when connecting to SSH servers, so you won't run into these authentication limits.
Some SSH clients don't support specifying public keys in `IdentityFile`.
See [SSH client compatibility](/ssh/agent/compatibility/).
### Create an SSH agent config file
You can also create an optional [SSH agent config file](/ssh/agent/config/) (`~/.config/1Password/ssh/agent.toml`). The agent config file allows you to specify which keys the SSH agent can make available to SSH servers and the order it offers those keys to servers. You can use the SSH agent config file alongside your SSH client config file (`~/.ssh/config`) to help further avoid authentication limits.
## Use multiple GitHub accounts
When you connect to remote Git repositories from your local machine, all connections that are authenticated over SSH use the same `git` user. If you want to use SSH with multiple Git identities on the same machine, such as a work and personal account, you'll need to:
* Define SSH host aliases for the different Git identities in your SSH config file.
* Configure which SSH keys are used to authenticate connections to the remote Git repositories.
* Update the URLs for your Git remotes to use the new SSH host aliases.
To get started, follow these steps:
1. In the 1Password app, locate the SSH Key item for one of your Git accounts.
2. Select the down arrow on the "public key" field and choose **Download**.
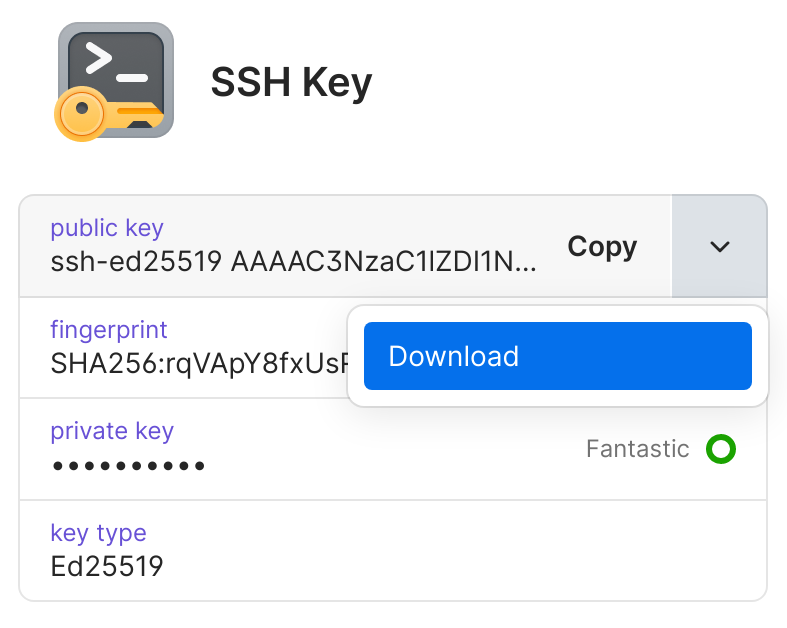 3. Save the public key to your `~/.ssh/` directory.
4. Repeat steps 1–3 for each SSH key you need to use.
5. On your local machine, edit your `~/.ssh/config` file to add SSH host sections for each Git identity.
For example, to configure SSH hosts for your personal and work GitHub accounts, you would add the following to your SSH config file:
```text ~/.ssh/config theme={null}
# Personal GitHub
Host personalgit
HostName github.com
User git
IdentityFile ~/.ssh/personal_git.pub
IdentitiesOnly yes
# Work GitHub
Host workgit
HostName github.com
User git
IdentityFile ~/.ssh/work_git.pub
IdentitiesOnly yes
```
You can adjust the host (the alias name) and hostname, if needed, and you'll need to set `IdentityFile` to use the public key you saved in your `~/.ssh/` directory for that repository.
6. For each Git repository, change the `git` URL to use one of the new SSH host aliases instead of the default host URL, such as `git@github.com`.
```bash theme={null}
git remote set-url origin :/.git
```
For example:
```bash theme={null}
git remote set-url origin personalgit:1password/1password-teams-open-source.git
```
Now your SSH clients will know which SSH key to use for each Git identity.
Learn more about how to [sign Git commits with SSH](/ssh/git-commit-signing/).
## Learn more
* [Autofill public keys](/ssh/public-key-autofill/)
* [Manage SSH keys](/ssh/manage-keys/#generate-an-ssh-key)
* [Workflow: Secure your SSH & Git workflows](/get-started/secure-ssh-git-workflows)
3. Save the public key to your `~/.ssh/` directory.
4. Repeat steps 1–3 for each SSH key you need to use.
5. On your local machine, edit your `~/.ssh/config` file to add SSH host sections for each Git identity.
For example, to configure SSH hosts for your personal and work GitHub accounts, you would add the following to your SSH config file:
```text ~/.ssh/config theme={null}
# Personal GitHub
Host personalgit
HostName github.com
User git
IdentityFile ~/.ssh/personal_git.pub
IdentitiesOnly yes
# Work GitHub
Host workgit
HostName github.com
User git
IdentityFile ~/.ssh/work_git.pub
IdentitiesOnly yes
```
You can adjust the host (the alias name) and hostname, if needed, and you'll need to set `IdentityFile` to use the public key you saved in your `~/.ssh/` directory for that repository.
6. For each Git repository, change the `git` URL to use one of the new SSH host aliases instead of the default host URL, such as `git@github.com`.
```bash theme={null}
git remote set-url origin :/.git
```
For example:
```bash theme={null}
git remote set-url origin personalgit:1password/1password-teams-open-source.git
```
Now your SSH clients will know which SSH key to use for each Git identity.
Learn more about how to [sign Git commits with SSH](/ssh/git-commit-signing/).
## Learn more
* [Autofill public keys](/ssh/public-key-autofill/)
* [Manage SSH keys](/ssh/manage-keys/#generate-an-ssh-key)
* [Workflow: Secure your SSH & Git workflows](/get-started/secure-ssh-git-workflows)