- Install and configure the 1Password app and CLI.
- Load project secrets from 1Password instead of plaintext
.envfiles. - Use 1Password to approve SSH and Git requests with your fingerprint.
Before you begin
You can authenticate 1Password developer tools in two ways:- Local development: Use the 1Password desktop app for fast setup and human-in-the-loop approval with biometrics.
- Automation and production: Use service accounts for automated workflows with least privilege access.
Step 1: Install the 1Password app
If you haven’t already, sign up for a 1Password account. Then install 1Password for Mac, Windows, or Linux. After you install the app:- Open the 1Password app and select your account or collection at the top of the sidebar.
- Navigate to Settings > Security.
- Turn on the setting to unlock the app using Touch ID, Windows Hello, or Linux system authentication. This allows you to authenticate most developer tools with your fingerprint.
Step 2: Install 1Password CLI
1Password CLI (op) lets you access secrets and manage your account from your terminal and scripts. It’s the fastest way to start experimenting with 1Password developer tools.
To install 1Password CLI, use one of the following package managers, or download the latest release.
- homebrew
- winget
- Open the 1Password app and select your account or collection at the top of the sidebar.
- Navigate to Settings > Developer.
- Select Integrate with 1Password CLI.
op vault list lists all the vaults in the authenticated account.
Step 3: Create an Environment (beta)
Environments (beta) are like vaults for your developer credentials. You can manage your project’s environment variables together in an Environment, then securely load each set of secrets directly from 1Password when you need them. Start by creating an Environment for a specific project or development context, likeiOS App Staging.
- In the 1Password app, select Developer in the sidebar, then select Environments.
- Select New environment, enter a name, and select Save.
- Open the Environment, then select Import .env file to import project secrets from an existing environment file or New variable to add variables manually.
Step 4: Choose your first workflow
Start with one of these:Securely load developer secrets from 1Password
Load your project secrets directly from 1Password when you need them, without exposing your secrets in plaintext.
Simplify your SSH and Git workflows
Store SSH keys in 1Password and approve Git and SSH requests with biometrics.
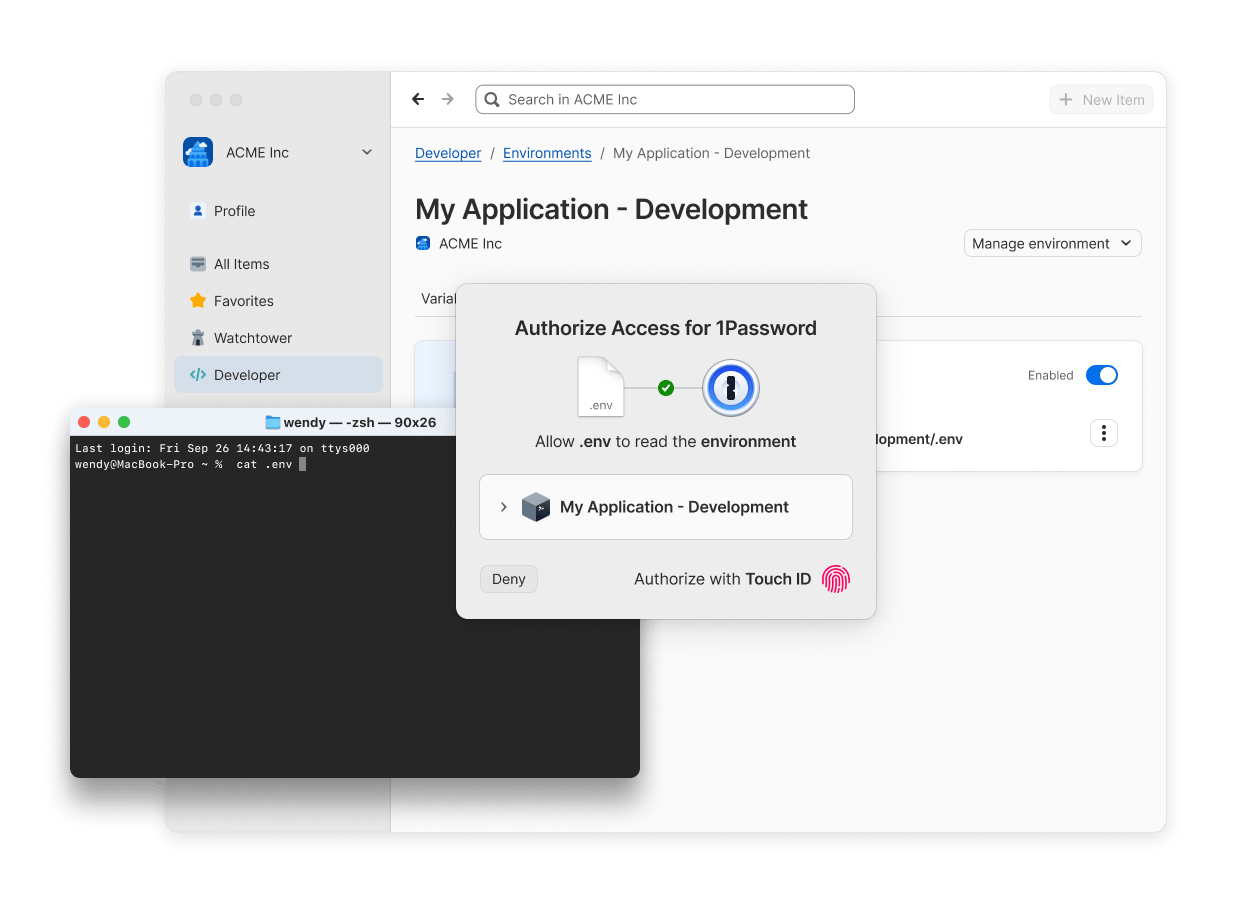
Securely load developer secrets from 1Password
You can access the project secrets stored in an Environment directly from 1Password using a locally mounted.env file on Mac or Linux. The contents of this file aren’t tracked by Git or stored on disk, and are only available at the moment you access it.
- In the 1Password app, go to Developer > Environments and open the Environment you created in step 3.
- Select the Destinations tab, then select Configure destination for local
.envfile. - Select Choose file path and choose the path on your device where you want to create your local
.envfile, then select Mount .env file.
.env file is saved. Then run the following command with the name of your file.
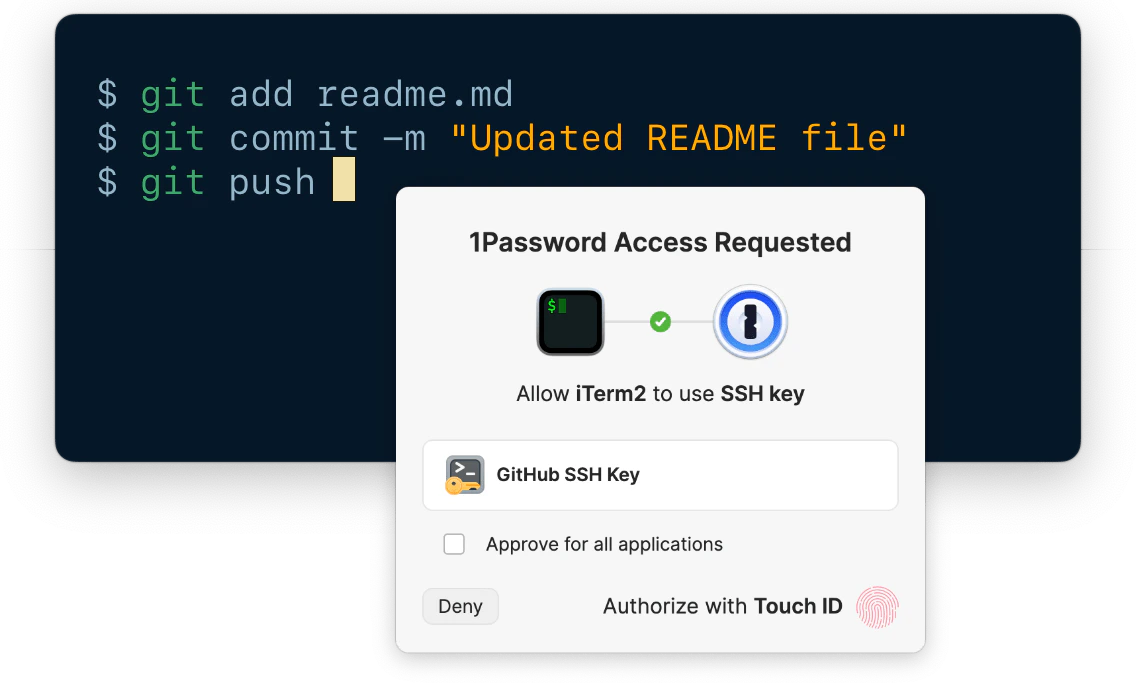
Simplify your SSH and Git workflows
1Password’s SSH agent secures your SSH keys by keeping them encrypted and off disk, and also brings biometric authentication to your SSH and Git workflows.Step 1: Generate or import an SSH key
First generate a new SSH key in 1Password in your Personal, Private, or Employee vault. You can also import an existing key.- Select New Item > SSH Key.
- Select Add Private Key > Generate a New Key.
- Select an SSH key type, Ed25519 or RSA, then select Generate.
- Select Save.
Step 2: Set up the SSH agent
- Open the 1Password app and select your account or collection at the top of the sidebar.
- Navigate to Settings > Developer.
- Select Use the SSH Agent. Turn on the option to display key names to see which key 1Password is requesting access to.
- Follow the steps to configure your SSH or Git client.
On Windows, the 1Password SSH agent only works with SSH clients that support Microsoft OpenSSH. Learn how to check if the OpenSSH Authentication Agent service is installed and running.
Step 3: Set up Git commit signing
You can also use your SSH keys in 1Password to sign Git commits and verify authorship on platforms like GitHub.- Open the SSH key you want to use in your 1Password desktop app.
- Select > Configure Commit Signing.
- In the next window, select Edit Automatically to add the key to your
~/.gitconfigfile. - Register your public key as a signing key in your preferred Git service (such as GitHub or GitLab).
- Commit some code. 1Password will prompt you to authenticate the same way you unlock your device, like with your fingerprint.

Next steps
Choose what you want to do next:Build integrations
Use CLI, SDKs, service accounts, or Connect server.
Secure AI access
Provide credentials to AI agents and tools without exposing them in prompts, LLM context, or config files.
Secure your developer secrets
Learn more about specific configurations for securely loading secrets.
Secure your deployments
Set up CI/CD, containers, and production runtime access.
Secure SSH & Git workflows
Learn more about setting up 1Password for SSH & Git.